


You're sitting with the brace in your hand, one sock on, and no clear idea which strap should move first. It looks simple enough, but a small mistake can leave the heel sliding, the side supports pressing on the ankle bones, or the foot feeling trapped instead of supported. The safest approach is to treat fitting as a short routine you can repeat, not a one-time guess.
The order matters more than force. Seat the heel first, keep the ankle near neutral, and tighten only enough to stop movement without squeezing the foot. A brace that feels comfortable while you're seated may shift once you stand, put on shoes, walk, or develop swelling. Guidance on wearing an ankle brace with shoes is useful, but your own walking check is what confirms the fit.
Table of Contents
- The First-Fit Moment Most People Get Wrong
- Setting Up Before You Touch the Straps
- Putting the Brace On Step by Step
- How Tight Is Tight Enough
- Break-In Schedule and Daily Wear Guidance
- Troubleshooting Fit Problems Without Over-Tightening
- Dynamic Fit and Knowing When to Call a Professional
The First-Fit Moment Most People Get Wrong
A typical first fitting goes like this: the wearer opens every strap, puts the brace around the ankle, pulls the top section tight, and then wonders why the heel keeps lifting. The instinct is to add more tension. In practice, the problem often began earlier, when the heel was never fully seated or the foot was pointed downward during application.
Think of the brace as a guide for the ankle, not a clamp. It should limit unwanted movement while preserving comfortable motion and normal circulation. If it feels restrictive enough to make you avoid walking, it isn't fitted well enough to provide dependable support during real activity.
Three principles make the process easier:
- The heel comes first. The heel pocket or molded cup has to sit directly under the heel before you secure the upper sections.
- Neutral beats pointed. Position the ankle near a right angle, approximately 90 degrees, rather than letting the foot hang downward.
- Standing fit is the true test. Seated comfort is only the starting point. You need to stand, walk, and reassess before deciding the brace is ready.
Practical rule: If tightening a strap seems to fix one problem but creates pressure somewhere else, reopen the brace and start with heel position instead of pulling harder.
This mindset also prevents a common error with unfamiliar designs. A lace-up brace, a stirrup, a figure-eight support, and a sleeve don't use the same installation logic. Follow the instructions for the exact model, because hinges, air cells, strap paths, and side supports can differ substantially.
Setting Up Before You Touch the Straps
Preparation takes little time, but it determines whether the brace stays centered. Sit at the edge of a chair or bed with the foot supported and the ankle close to 90 degrees. Don't fit the brace with the toes pointed downward, because that position can alter heel seating and make later movement uncomfortable.
Use a clean, thin sock unless the manufacturer's instructions say otherwise. The sock should lie flat under the heel and across the foot, without folds that can become pressure points. Choose the footwear you'll use, especially if the brace needs to fit inside a running shoe, work shoe, or cleat.
Before placing your foot inside:
- Open everything fully. Loosen all laces, hook-and-loop tabs, cuffs, and adjustable straps. A brace should open enough for you to place the foot without forcing it.
- Find the heel pocket. This is the area designed to receive and center the heel. It may be molded, padded, or formed by the brace fabric.
- Identify the tongue or top panel. It should lie flat over the top of the foot, not bunch under the toes or fold behind the Achilles tendon.
- Locate the lower and upper sections. The lower section controls the foot and instep. The upper section secures the ankle or lower leg.
- Check the side supports. On a stirrup or hinged brace, the uprights should sit alongside the ankle rather than directly over the bony prominences.
| Brace type | Key components | Typical best use |
|---|---|---|
| Lace-up | Laces, tongue, heel pocket, foot and upper straps | Adjustable support when you need a close, shoe-like fit |
| Semi-rigid stirrup | Side shells or uprights, heel base, lower-leg straps | Directional stability with more structure around the ankle |
| Figure-eight | Crossing straps, instep section, heel route, ankle closure | Targeted support around the foot and ankle |
| Sleeve | Elastic or supportive fabric, heel and toe openings | Light support, comfort, and easier daily application |
The brace should be centered before any closure moves. If you're also doing clinician-approved mobility work, keep ankle mobility exercises separate from the fitting routine so you don't stretch or reposition the brace while securing it.
Putting the Brace On Step by Step
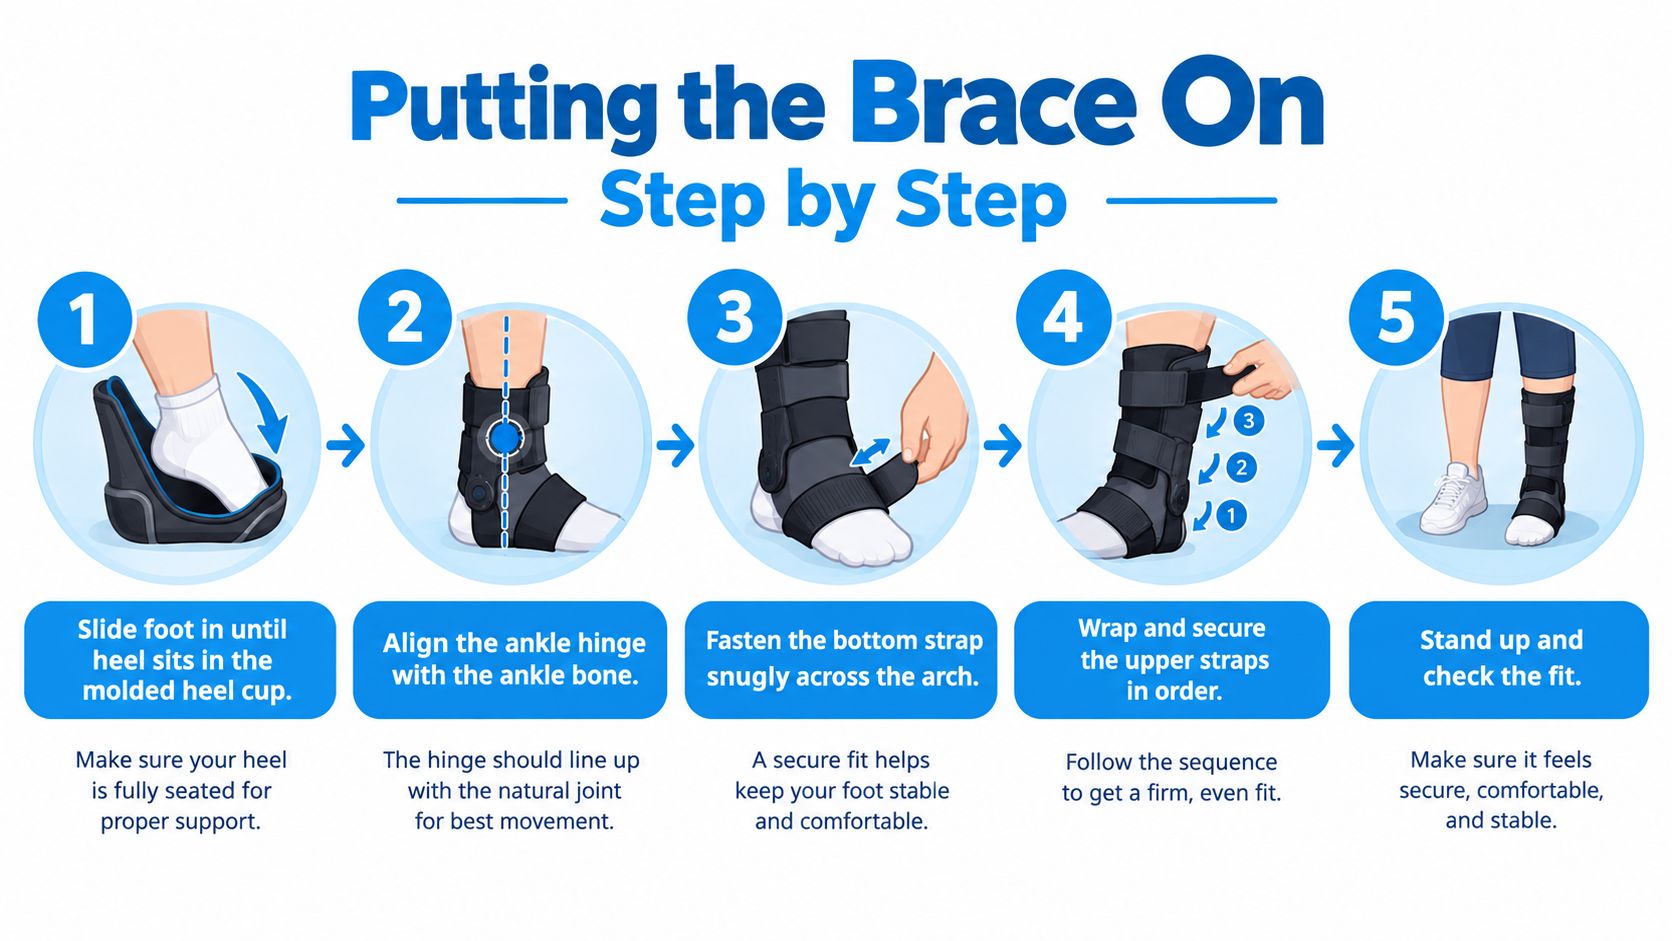
Start with the foot, not the ankle. Slide the foot into the open brace until the heel is fully down in the molded cup or heel pocket. Check that the brace is centered and that no fabric, lace, or edge is folded across the Achilles tendon or directly over either ankle bone.
Lace-up braces
With the ankle near neutral, lace the brace like a shoe. Begin at the lower eyelets and work upward, keeping the tension even on both sides. If the model includes foot-specific straps, route them over the forefoot and under the arch as directed, then close the circumferential ankle strap.
The lower foot section should stabilize the brace before the upper section is tightened. Secure the instep first, then the ankle and lower-leg sections. The result should feel firm and balanced, not like a strap is doing all the work.
Semi-rigid stirrup braces
Place the heel squarely in the base and position the side uprights alongside the ankle. The supports should surround the ankle without pressing directly on the malleoli, the prominent bones on each side. Fasten the lower section first, then secure the straps around the lower leg.
If the hinge or side support sits too high, too low, or directly on a bony point, stop and reposition it. More tension won't correct a support that's in the wrong location.
Figure-eight straps
Keep the ankle close to neutral while you wrap the strap across the instep and around the heel in the pattern specified by the manufacturer. The crossing portions should lie flat, with no twists or ridges. Alternate the direction of the wrap only if the brace instructions call for it, because right and left feet may use different routes.
Sleeve-style braces
Pull the sleeve over the foot with a smooth, sock-like motion. Seat the heel in the heel opening if there is one, then smooth the fabric over the ankle. Avoid gathering the material behind the Achilles tendon or leaving a tight band concentrated at one point.
For every design, finish with the same basic sequence: lower foot, ankle, upper section, then footwear. A supportive compression option such as a compression ankle sleeve should still be checked for heel position and circulation after you stand.
How Tight Is Tight Enough
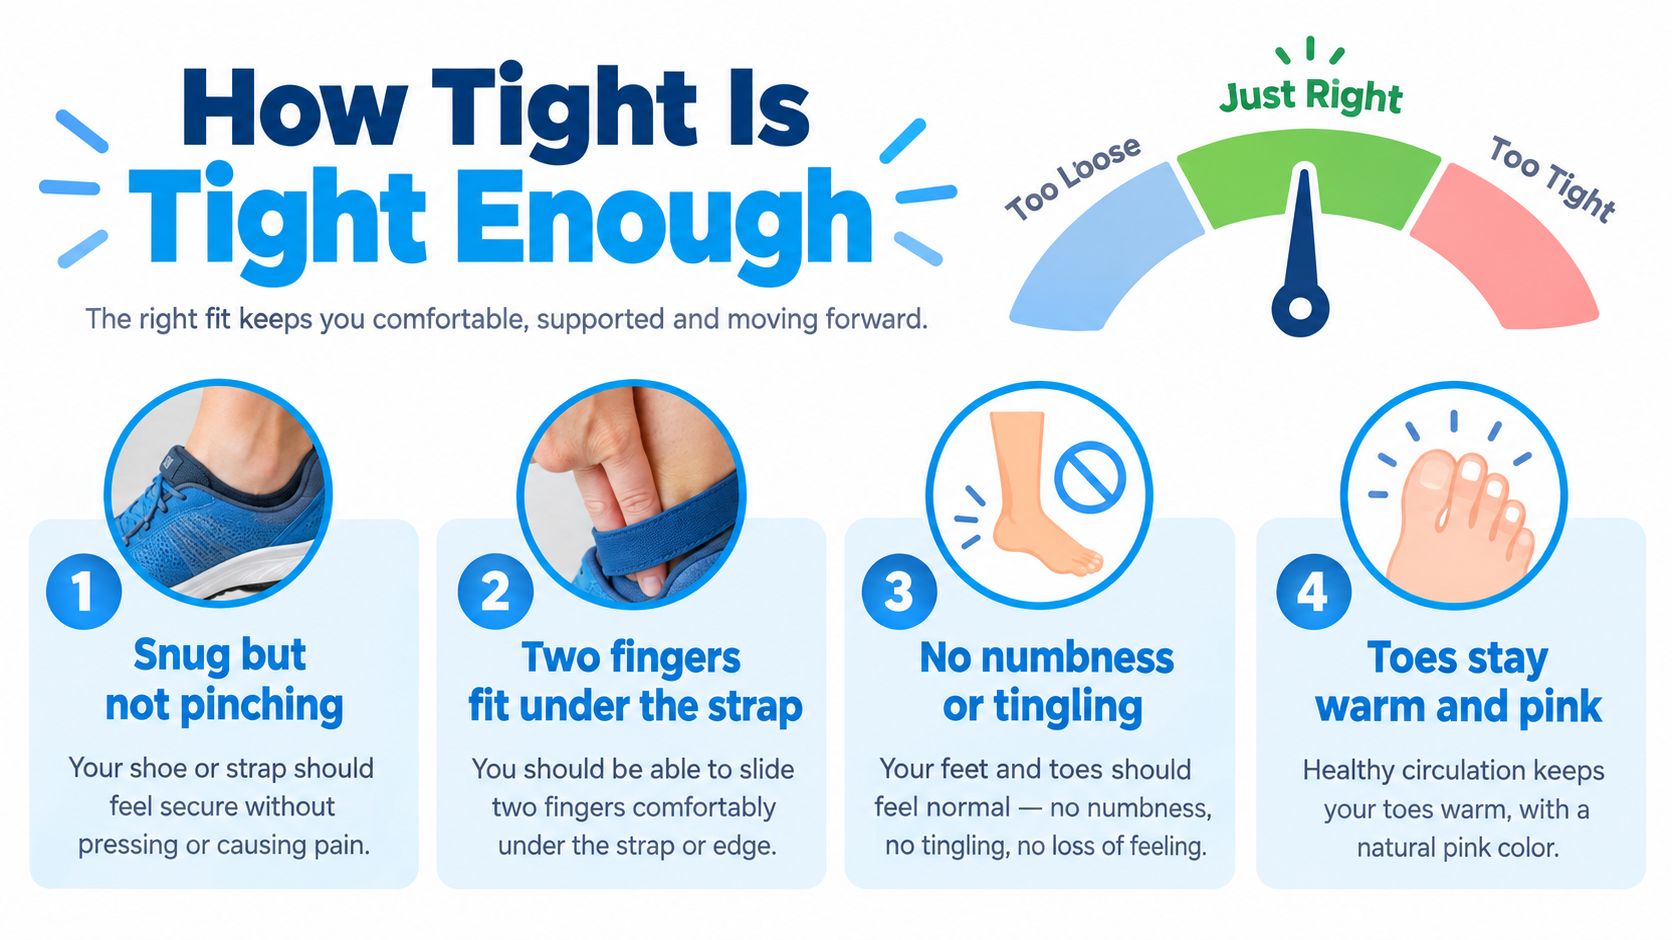
The correct tension is snug, stable, and comfortable. It isn't the maximum force your fingers can create. For many designs, approximately two fingers should fit beneath the upper edge or a major strap, provided the product instructions don't specify a different fitting method.
Lift the foot slightly, rock it gently, and notice whether the brace shifts. Then stand in the intended shoe. A well-fitted brace should feel comparable to a firmly laced walking or hiking shoe. It shouldn't feel like a blood-pressure cuff, and it shouldn't create a single hard pressure point over the ankle bones.
Check these signs before walking:
- Good fit: The heel stays seated, the brace doesn't migrate, and support feels even.
- Too loose: The foot slides, the heel lifts, or the side supports move away from the ankle.
- Too tight: The toes become numb, cold, tingly, painful, or visibly different in color.
- Poor alignment: A hinge, shell, or strap presses on one small area even though the overall tension feels moderate.
Clinical evidence illustrates why comfort and adherence matter. In a randomized trial summarized in the clinical literature, lace-up or semi-rigid bracing was associated with 0.47 versus 1.41 acute injuries per 1,000 athletic exposures, with a hazard ratio of 0.32 and a 95% confidence interval of 0.20–0.52. Reinjury incidence was 0.83 versus 1.79 per 1,000 exposures, with a hazard ratio of 0.39 and a 95% confidence interval of 0.17–0.90. These figures come from the clinical trial summary on ankle bracing. They support a practical point: a brace only helps if the wearer can move comfortably and keep wearing it as directed.
If you notice pressure, don't automatically tighten another strap. Loosen the brace, reseat the heel, smooth the layers, and repeat the standing check. A comparison of compression levels can also help you distinguish gentle support from excessive pressure.
Break-In Schedule and Daily Wear Guidance
A new brace should be introduced gradually, even when the initial fitting feels good. One professional fitting guide recommends wearing a rigid or hinged brace for 1–2 hours during the first few days, then increasing daily wear progressively once the foot remains comfortable. You can review the professional ankle-brace fitting guide for product-specific details.
Use the first sessions to inspect the skin and movement rather than to test endurance. Wear the brace with the sock and footwear intended for normal use, walk indoors briefly, and remove it if a sharp pressure point develops.
A brace that becomes painful during the break-in period is giving you information. Remove it, reassess the fit, and don't try to solve the problem by tightening it further.
For light daily movement, wear the brace during the activity that needs support and remove it for rest unless your clinician has given different instructions. Sport and uneven-ground activity demand a more careful check because repeated movement can expose heel slip or strap migration. Overnight wear should be guided by the brace instructions or a clinician, particularly after injury or when swelling is substantial.
People recovering from an injury may need structured support while strength and balance return. Someone using a brace for occasional stability may need less wear time. In both situations, the brace should supplement rehabilitation rather than replace progressive balance and coordination work.
Troubleshooting Fit Problems Without Over-Tightening
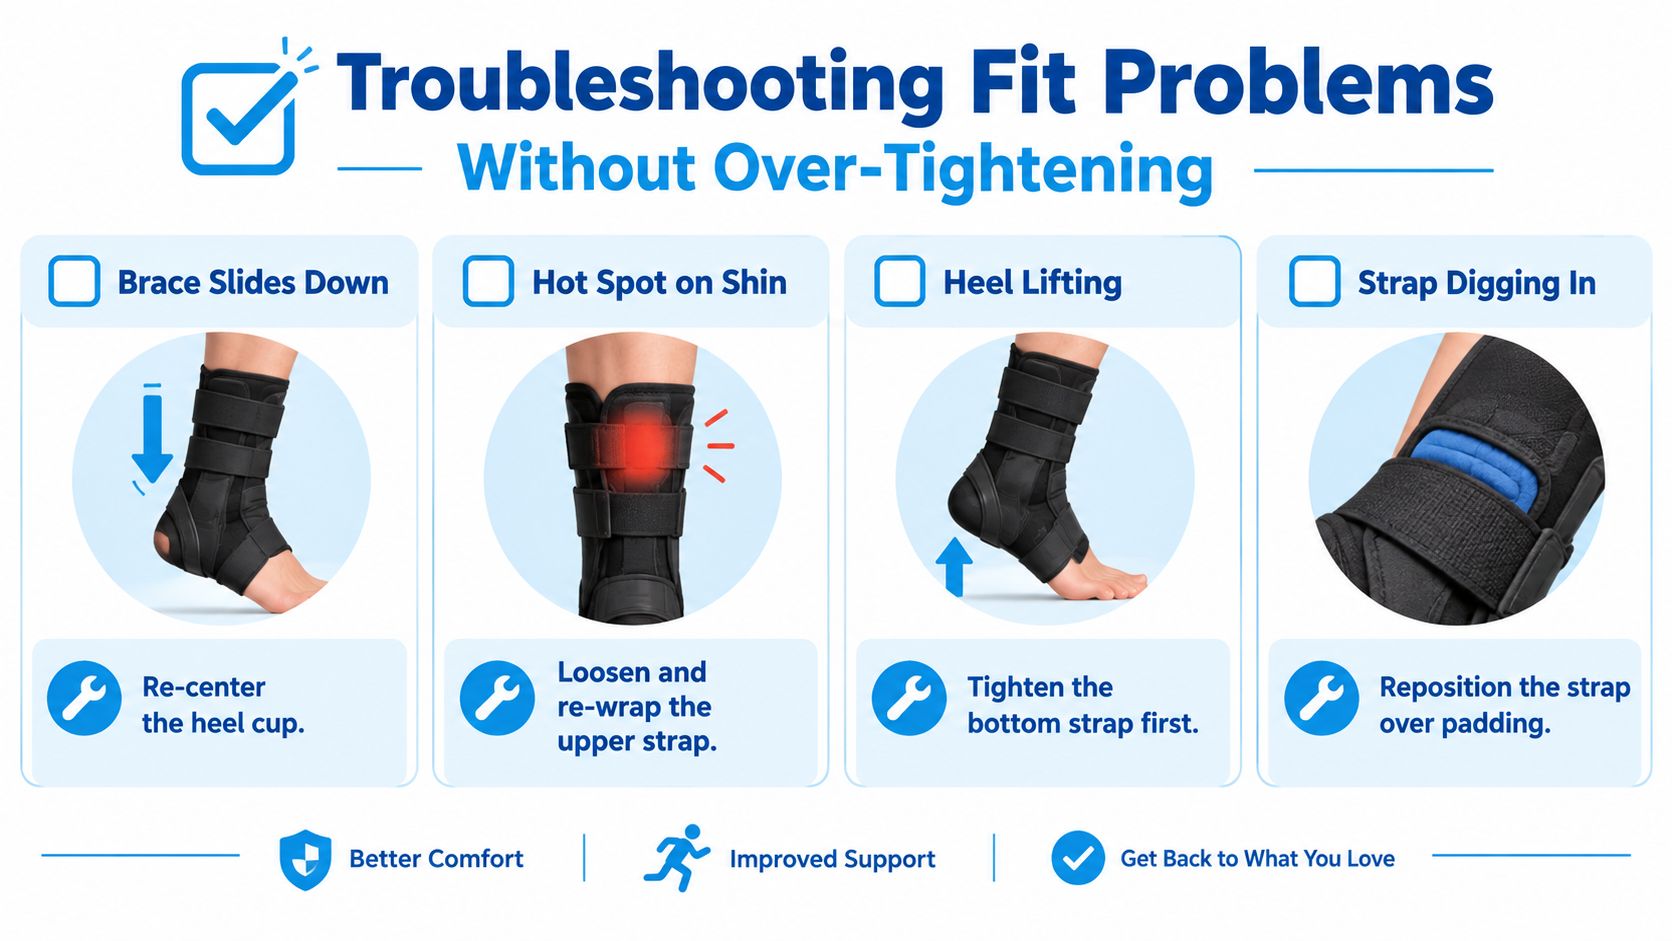
When a brace feels wrong, pulling harder is usually the least useful first response. Symptoms tell you where to look, but they don't always tell you to add tension.
| What you notice | Likely issue | First correction |
|---|---|---|
| Heel slips or lifts | Heel wasn't fully seated, or the lower foot section is loose | Reopen the brace, push the heel fully into the pocket, and secure the lower section first |
| Brace slides down | Migration from poor centering, size mismatch, or incompatible footwear | Re-center the brace and reassess the size and shoe before increasing tension |
| Hot spot near an ankle bone | Side support or strap is misaligned | Reposition the support so it sits alongside the bone, not directly on it |
| Strap digs into the skin | Pressure is concentrated in one area | Smooth the layer, change the strap route if allowed, and reduce tension |
| Numbness or tingling | Possible nerve or circulation pressure | Loosen or remove the brace immediately and reassess |
| Coldness or color change | Circulation may be compromised | Remove or loosen the brace and seek advice if the change persists |
A lace-up model should be corrected from the bottom upward. A stirrup needs accurate side-support placement. A figure-eight brace needs the correct crossing path, and a sleeve needs even fabric distribution rather than a rolled edge. If the heel still slips after you reseat it, check whether the brace is the wrong size or whether the shoe leaves too much room for movement.
Some problems cannot be corrected at home. If the brace permits substantial rolling despite correct placement, the support may not match the instability or injury. If side components repeatedly press on the ankle bones, choose a different fit or have the model assessed rather than padding over a persistent pressure point.
A brace should be loosened and reassessed for numbness, tingling, coldness, abnormal color, worsening pain, or concentrated pressure. Persistent symptoms deserve professional guidance.
Dynamic Fit and Knowing When to Call a Professional
The fitting isn't complete when every strap is closed. It's complete when the brace remains centered after you stand, walk, and allow normal changes in swelling and movement to affect the ankle.
Use this short dynamic check:
- Stand in the intended footwear. Confirm that the heel remains down and the brace doesn't pinch when your weight transfers onto the foot.
- Walk indoors for several minutes. Notice whether the brace migrates, twists, or creates rubbing.
- Stop and inspect. Check heel position, toe warmth and color, strap tension, and the alignment of hinges or side supports.
- Walk longer, then reassess. Swelling, sweat, and repeated movement can change a fit that seemed correct while seated.
- Adjust only the source of the problem. If the heel moved, reseat the heel. If a strap digs in, reposition it. Don't tighten every closure at once.
The guidance on ankle braces and sprains can help place bracing within a broader recovery plan. A brace should support progressive rehabilitation, not replace strength, balance, or coordination work.
Stop self-fitting and seek clinician guidance for suspected fracture, marked deformity, worsening swelling, persistent numbness, or inability to bear weight. Those signs may indicate an injury that requires assessment beyond brace adjustment.
Thermo Recovery Wear offers compression-lite ankle sleeves and braces designed for light daily support, including options for people who don't tolerate tight compression. Visit Thermo Recovery Wear to review the ankle-support options, sizing guidance, and wear-care information before choosing your next layer of support.


