


You measured twice, wrote the number down, and still opened a sleeve that rides up or pinches. The tape was not the problem. The path was. A shirt chart often counts from the middle of your back to the cuff, while a recovery sleeve wants the circumference of the joint it sits on. Those are different numbers for the same arm, and mixing them is how careful people still order the wrong size.
How are sleeves measured depends on whether you are sizing a body or checking a finished piece. Body numbers describe your limb. Product numbers describe the sleeve. Read a chart against the first, and only compare the second after you know which landmarks it used.
Table of Contents
- What to Measure for Each Sleeve Type
- How to Take Body Measurements Step by Step
- Why Sleeve Length Means Different Things
- Matching Your Numbers to the Size Chart
- Checking a Sleeve You Already Own
- Keeping the Fit Through Wear and Washing
- Confirm Your Size Before You Order
What to Measure for Each Sleeve Type
A sleeve is sized from a body circumference at a specific joint, not from a generic S, M, or L on the label. The landmark changes with the product, and length alone will not tell you whether the opening will stay put.
| Sleeve | Measure | Where to place the tape |
|---|---|---|
| Knee | Leg circumference | About 2 inches above the knee |
| Ankle | Ankle circumference | Narrowest point just above the ankle bone |
| Wrist | Wrist circumference | Wrist crease or narrowest intended opening |
| Elbow | Elbow circumference | Around the joint with the arm bent |
| Shoulder | Upper-arm circumference and wrist-to-armpit length | Largest point of the upper arm; length along the outside of the arm |
| Back | Waist circumference | Natural waist, matching the back sleeve chart |
Knee: Wrap a flexible tape around the leg about two inches above the knee. That band is where most knee sleeves grip, so a calf or mid-thigh reading will not match the chart.
Ankle: Use the narrowest point just above the ankle bone. A reading over the bone itself looks larger and pushes you into a size that slides.
Wrist: Measure at the wrist crease, or at the narrowest opening the sleeve will sit on. A dress-shirt cuff is a different object. If you are also sorting layering button-down shirts without bunching, keep that shirt length separate from this joint reading.
Elbow: Measure around the joint with the arm bent the way it sits when the sleeve is worn. A straight arm understates the elbow and can make the sleeve feel tight once you flex.
Shoulder: You need two numbers. Upper-arm circumference at its largest point, and length from the wrist to the armpit along the outside of the arm. One without the other leaves the top edge or the cuff guessing.
Back: Use waist circumference at the natural waist, because that chart is built on the waist, not on a limb.
The table shows where the tape goes. Each product's own chart sets the final size. If you are choosing between a snug recovery sleeve and a lighter option, the difference between non-compression and compression sleeves changes how that same circumference should feel, not where you place the tape.
Practical rule: Write every number down, with the side and the unit, before you open a size chart. The chart should be read against your body, not against a guess you are holding in your head.
How to Take Body Measurements Step by Step
Measure the body, not an existing garment, with a flexible tape. A worn sleeve has already stretched, and copying it copies the error.
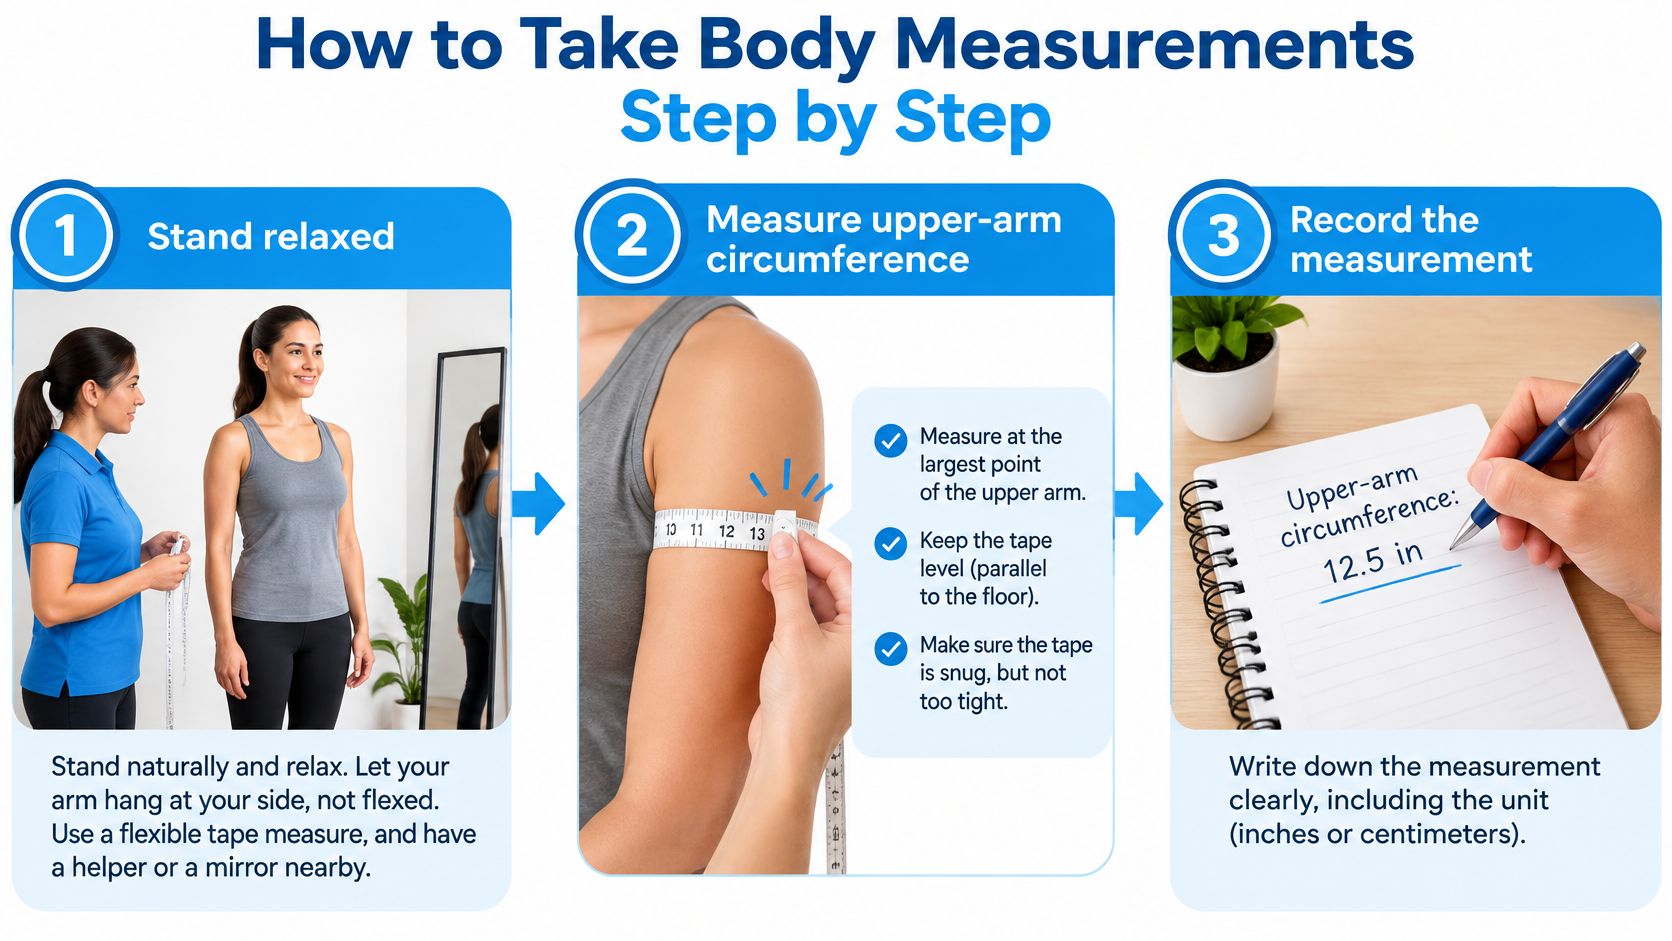
The ASTM F1731 body-measurement method runs arm length from the center-back neck, over the outside of a slightly bent elbow, to below the wrist bone and above the hand. A garment sleeve is normally taken from a shoulder or armhole seam to the opening. For a recovery sleeve that stops below the shoulder, circumference at the product's top edge and at the joint center is more useful than a full shoulder-to-wrist length. U.S. apparel sizing is voluntary rather than one mandatory national size-labeling system, so the landmarks and the product chart control the pick, not the letters S, M, or L.
The sequence
- Stand relaxed with a flexible tape and, if you can, a helper or a mirror. Let the arm hang naturally, not flexed, so the muscle is not pumped up for the reading.
- Measure upper-arm circumference at its largest point. Keep the tape level and snug without pressing into the skin. A dented tape reads small and the sleeve arrives too tight.
- Measure forearm circumference at its largest point. A muscular forearm and a slim wrist often fall in different size columns, and you need both before you choose.
- Measure wrist circumference at the wrist crease, or at the narrowest opening the sleeve will sit on. This is the end that rolls if it is too wide.
- For length, start at the center-back neck near the seventh cervical vertebra, run across the shoulder, then down the outside of the slightly bent arm to just below the wrist bone. Hold the elbow angle still. A straighter arm on the second pass shortens the number.
- Repeat each reading until two results match, and write it down with its side and its unit. Inches and centimetres do not belong on the same line without a label.
- Measure both arms. If swelling or injury makes them differ, size from the larger relevant number. The smaller arm can wear a sleeve that is slightly roomy. The larger arm cannot wear one that cuts in.
The same tape habits show up in measuring for clothes with Display Guru: level tape, light tension, no bulky layers. Those slips are the usual reason a careful session still fails. A sweater adds false inches. A yanked tape gives a falsely small size and, later, too much pressure. A moving elbow changes the length between the first reading and the check.
A usable set is four or five numbers, each labelled with its side, taken the same way twice. For a knee, the parallel habit is on our knee sleeve sizing chart: one circumference, about two inches above the knee, written before you look at letters.
A good sheet looks boring. Left upper arm, right upper arm, forearm, wrist, and length, each with a unit. If you cannot tell which arm a number came from, measure again.
Why Sleeve Length Means Different Things
A sleeve-length number means nothing until you know the path the tape took. People treat "34 inches" as one fact. It is four possible facts, and they do not agree.
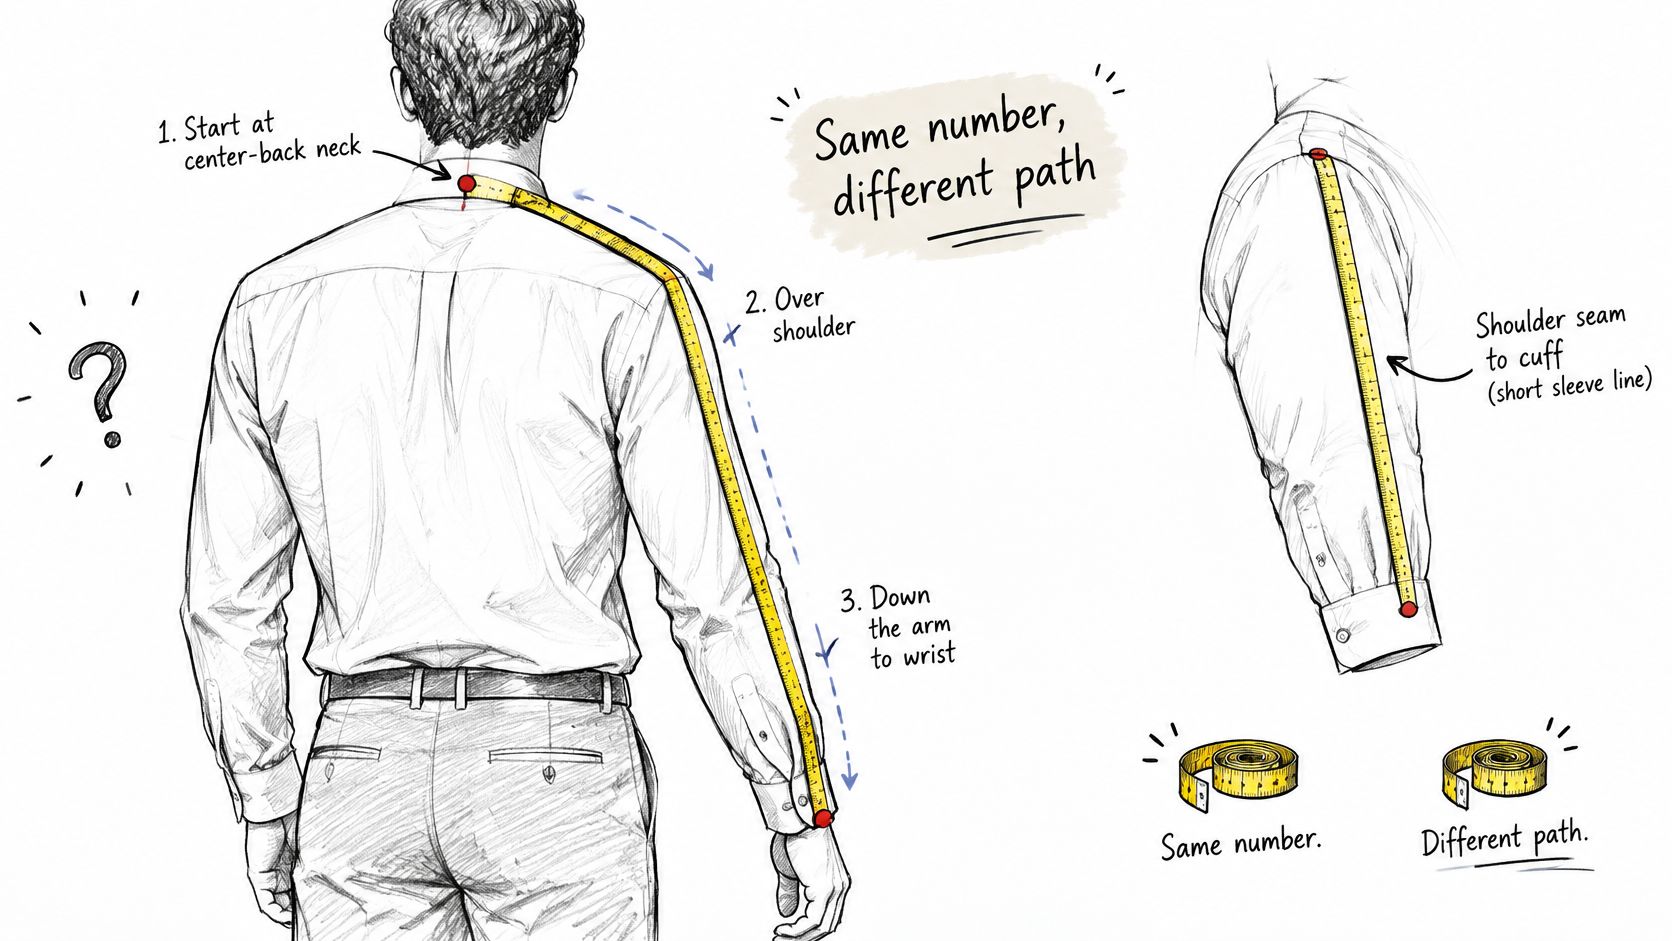
Body measurement starts at the center-back neck, near the prominent seventh cervical vertebra, runs across the shoulder, and continues down the outside of a slightly bent arm to the wrist. A garment measurement is taken on the item, usually from a shoulder or armhole seam to the cuff, or from the centre back below the collar to the cuff on a shirt. Same tape, different object.
| Path | Starts at | Ends at | Typical use |
|---|---|---|---|
| Body sleeve length (shirt convention) | Center-back neck near the seventh cervical vertebra | Below the wrist bone, along the outside of a bent arm | Sizing a person |
| Shoulder to wrist | Shoulder point | Wrist | Quick home measure; the path varies by chart |
| Underarm sleeve length | Underarm | Cuff | Outside-edge versus underarm comparison on garments |
| Garment sleeve length | Shoulder or armhole seam, or centre back below the collar | Cuff | Finished shirt or product chart |
Textile sizing standards keep those two apart. Body sleeve length runs from the center of the cervical vertebra around a bent arm to below the wrist bone. Garment sleeve length is read off the finished shirt, from the center back below the collar to the cuff. The bent arm is deliberate, because it records functional reach and elbow shape rather than a straight, relaxed limb. Use a flexible tape, do not pull it tight, and record both sides if swelling, injury, or asymmetry is present.
Now the part that causes returns. Length will not size a knee, elbow, wrist, or ankle sleeve. Those are sized by circumference at a defined landmark, and an arm length reading says nothing about whether your upper arm lands in a small or a large. Two numbers, two jobs.
For a recovery sleeve, the body measurement describes your anatomy and the product measurement describes the sleeve. If a chart does not name its path, ask before you order. An arm sleeve bought for tennis or daily ache, such as the options on our tennis arm sleeve page, still has to be read as body circumference plus the length the product covers.
Matching Your Numbers to the Size Chart
Knee sleeves on our chart run by leg circumference about two inches above the knee: S 12-14 inches (30-35 cm), M 14-16 inches (35-40 cm), L 16-18 inches (40-45 cm), XL 18-20 inches (45-50 cm), and XXL 20-22 inches (50-55 cm). Back sleeves are sized by waist: S 30-34 inches (76-86 cm), M 34-39 inches (86-98 cm), L 39-44 inches (98-112 cm), XL 44-50 inches (112-126 cm), and XXL 50-59 inches (126-150 cm).
| Sleeve | Size | Inches | Centimetres |
|---|---|---|---|
| Knee | S | 12-14 | 30-35 |
| Knee | M | 14-16 | 35-40 |
| Knee | L | 16-18 | 40-45 |
| Knee | XL | 18-20 | 45-50 |
| Knee | XXL | 20-22 | 50-55 |
| Back (waist) | S | 30-34 | 76-86 |
| Back (waist) | M | 34-39 | 86-98 |
| Back (waist) | L | 39-44 | 98-112 |
| Back (waist) | XL | 44-50 | 112-126 |
| Back (waist) | XXL | 50-59 | 126-150 |
Say the tape reads 16.5 inches about two inches above the knee. That sits inside L (16-18 inches), not M. I would order L and write "L, set by 16.5 in above the knee" on the sheet. Do not average a 16.5-inch knee with a slimmer calf and call it a medium.
When the columns disagree
NHS measurement material advises selecting by the patient's measurements and sizing up or down when upper-arm width is unusually large or small. Fit can depend on wrist, elbow or upper-arm circumference, and length at the same time. A person can land inside the right circumference band and still get bunching, rolling, gaps, or restricted movement if length and contour do not match.
- Use the limiting reading. Size on the measurement that is hardest to fit, not the average of every number on the page.
- Do not split the difference. If wrist says one column and upper arm says the next, contact support with both numbers instead of guessing a middle size.
- Check length on the tighter limb. Record the largest relevant circumference and the shortest length that still has to be covered.
- Repeat after you move. If you will walk or work in the sleeve, recheck with the tape level and snug, without compressing soft tissue.
The same "do not average a conflict" habit shows up in sizing help for luxury loungewear, where a chest and a waist can point at different letters. Joint sleeves are stricter, because a miss changes pressure, not just drape.
Write the chosen size next to the measurement that set it. "XL back, waist 46 in" is a record you can reuse. "I think I'm an XL" is not.
Checking a Sleeve You Already Own
The most common error is comparing your body circumference with a flat half-width. Those units are not the same thing, and the sleeve looks "too small" on paper when it is not.
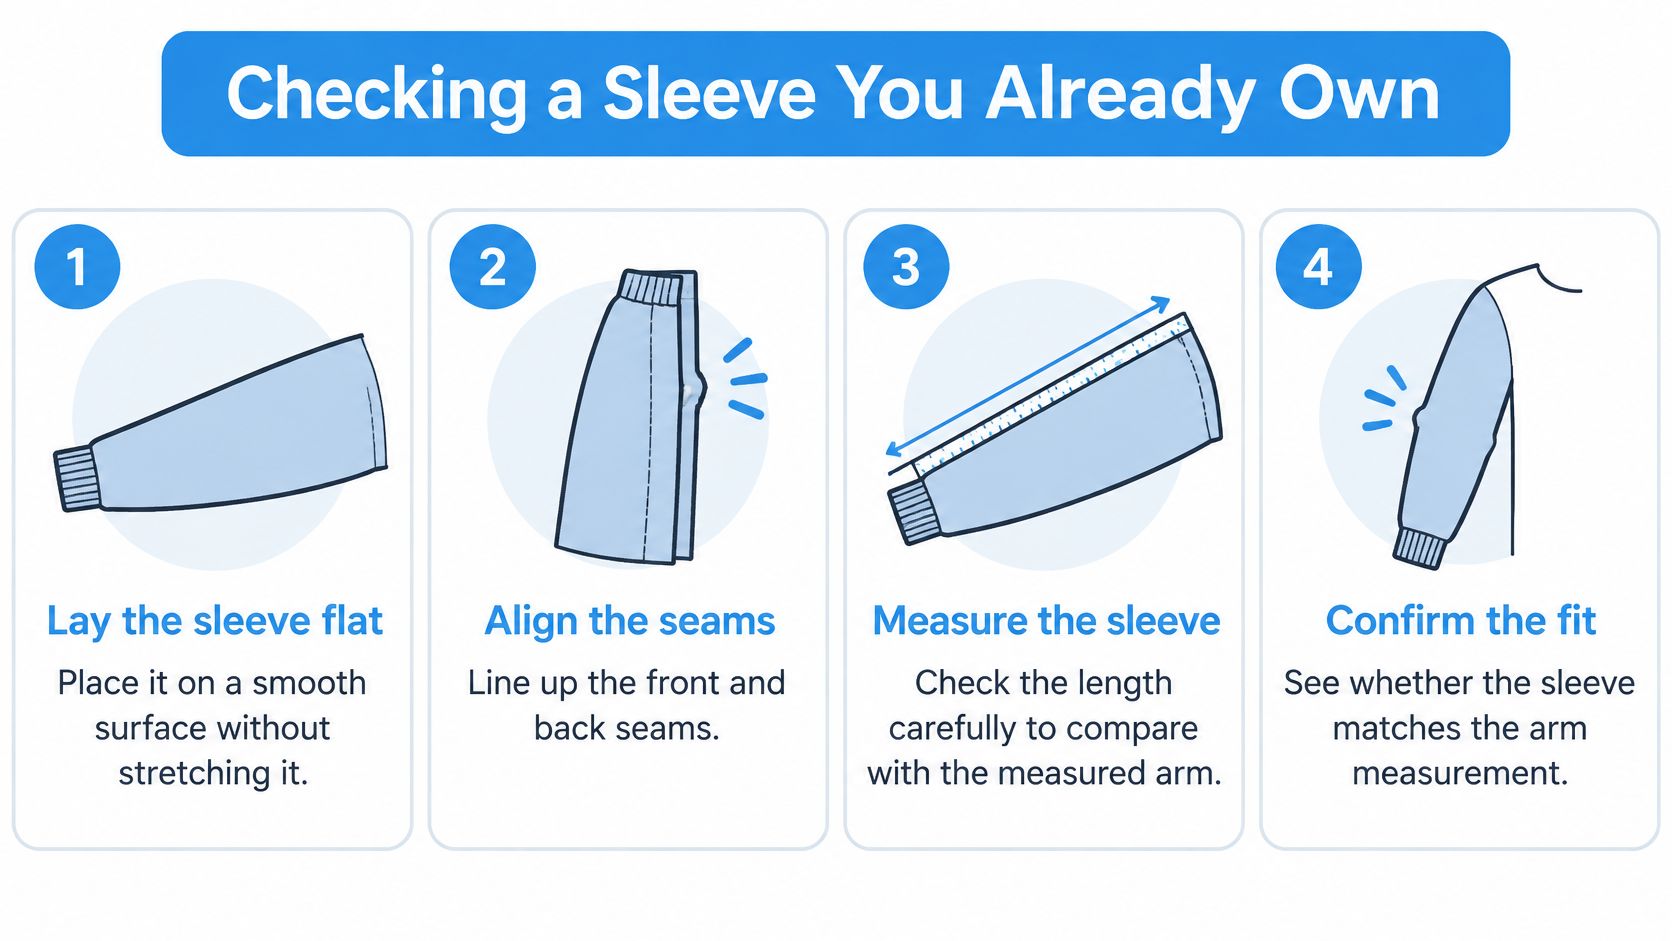
Orvis's measuring method separates outside-edge sleeve length from underarm sleeve length and places the upper-arm reading one inch below the armhole. That is why two brands' "sleeve length" figures may not be interchangeable. Define the point of measure first, then treat the sleeve as a flat product.
Flat check
- Lay it flat. Use a smooth surface and do not stretch the fabric. A pulled sleeve invents length and width you will not have when you wear it.
- Align the seams. Match front and back so the fold is a true edge, not a twist.
- Measure length on the outside edge. Run from the specified shoulder or armhole reference to the cuff. A raglan has no shoulder seam, so do not invent one.
- Turn widths into circumferences. Measure opening and upper-arm widths perpendicular to the fold, then double each width. Never set a half-width next to a full body number.
- Take three readings. Record to the nearest millimetre and keep only the set that repeats. One lucky pass is not a specification.
- Compare like with like. Set the garment's unstretched circumference, and a gently extended one, against your body circumference. Include the cuff opening. Skipping it hides a tight end.
A compressed or worn sleeve reads small. If the product specification names a landmark, that specification wins over a generic chart word. Publish, for yourself, the landmark, the posture, the tape tension, and whether the chart is body circumference or garment circumference.
Tick these before you decide the sleeve "doesn't fit the arm": flat, seams aligned, outside-edge length, doubled widths, cuff included, three matching readings, compared with the body number in the same unit.
Keeping the Fit Through Wear and Washing
The fit you measured is the fit you keep only if the fabric stays close to those numbers. Follow the care label on your product first.
Our back sleeve is made to sit directly against the skin for 24/7 wear. Wash it warm or cold and tumble dry it on low. Do not bleach, iron, or dry clean it. Heat, bleach, and dry cleaning can shift fibres and change how the same waist measurement feels. The same sleeve becomes softer with use, so a looser feel after a few weeks is not automatic proof that it stretched.
When it feels different
- Re-measure the same points you wrote down, on the same side, in the same unit.
- Compare the new numbers with the original sheet. A one-time soft feel is not a new size.
- If the difference repeats, use the new numbers on the size chart. Do not assume the old letter still applies.
- If it still feels wrong, check the limiting measurement against the chart before you blame the wash.
A simple routine covers most days: wash cold or warm, dry on low, and re-measure when the fit changes. Step-by-step wash details for knees are on our how to wash knee sleeves page. Keep the original sheet. The comparison takes a minute only if the first numbers are still labelled.
Confirm Your Size Before You Order
Measure with a tape before you buy. Each product has a sizing guide, and a printable ruler PDF is available, but the tape is the reliable check.
- Measure each landmark from the opening table with the same method, and write every reading with its side and unit.
- Match each reading to the chart and mark the limiting measurement, the one hardest to fit. Do not average.
- If two columns both claim you, contact support with the numbers. Do not split them.
- If you already own a sleeve, confirm its circumference with the flat check before you compare it with your body.
- Confirm the chart's path: body circumference or garment circumference, body length or garment length.
Then write the size next to the number that chose it, order from that line, and keep the sheet for the next purchase and for any re-check after wear. A padded option, covered in our padded leg sleeves notes, still starts from that same written circumference. The pad does not replace the tape.
Thermo Recovery Wear makes compression-lite recovery sleeves for knees, ankles, wrists, elbows, backs, and shoulders, sized from the joint and waist measurements in this guide rather than from a shirt-sleeve number. If you want a sleeve you can wear through the day without guessing the chart, start with your written measurements and visit Thermo Recovery Wear to match them to the right size.


