


You rolled the ankle stepping off a curb, and the joint still feels loose when you pull a shoe on. Or the sprain is a couple of weeks old and you're heading back to practice, unsure whether the brace stays on all day. How to brace an ankle is a stage-based decision, not a single product pick. Support should change as swelling settles, walking smooths out, and the task gets more demanding.
A brace limits excessive rolling. It does not tell you whether a bone is cracked, and it doesn't rebuild balance or strength. Match the device to the stage you're in, wear it for the loads that challenge the ankle, and keep the rehab going next to it. If you can't bear weight, or the ankle looks deformed, get it assessed before you fasten anything.
Table of Contents
- Match the Brace to Your Ankle and Activity
- Apply and Check a Lace-Up or Stirrup Brace
- How Long to Wear a Brace at Each Stage
- Warning Signs to Stop Bracing and Seek Care
- Decide When to Stop Bracing Safely
Match the Brace to Your Ankle and Activity
Choose support for the ankle's current demands. A mild sprain with light swelling may be comfortable in a compression wrap or soft sleeve, while a moderate sprain with bruising or a feeling of giving way may call for a lace-up or stirrup brace during walking. Marked swelling or a severe injury needs clinical assessment before you choose a brace. A walking boot is for use under medical direction.
| Option | Support level | Best for | Main limitation |
|---|---|---|---|
| Compression wrap or sleeve | Low | Comfort and mild swelling | Little restriction of sideways rolling |
| Stirrup brace | Moderate | Walking and daily tasks after a sprain | Can feel tight in narrow shoes |
| Lace-up brace | Moderate to high, adjustable | Mild to moderate sprains and sport use | Takes longer to put on and can be bulky in shoes |
| Semi-rigid brace | Moderate to high | Activity support, particularly after a prior sprain | Needs accurate sizing to work well |
| Figure-eight taping | Depends on application | Short-term support during sport | Requires skill and can lose its hold over time |
| Walking boot | High, immobilizing | Severe injuries under medical direction | Use only when directed by a clinician |
What the numbers actually support
Bracing can reduce the chance of another sprain, with the clearest benefit for people who have sprained an ankle before, according to this systematic review of ankle bracing. It supports the ankle during activity; it does not diagnose an injury or replace rehabilitation.
Practical rule: If this is your first sprain and you still cannot walk normally, get assessed rather than relying on a brace alone.
Sizing before the first wear
Measure around the ankle at the ankle bone and follow the brace maker's sizing chart. A poor fit can pinch or allow the brace to shift. Check that it fits inside the shoe you plan to wear for the activity. For more on choosing support to limit ankle rolling, see this guide to an ankle support brace to stop rolling.
As healing progresses, match the brace to the task: support that works for daily walking may not feel right in sport shoes. Avoid choosing a stiffer brace without a clear need, since extra restriction can make movement and shoe fit less comfortable.
Apply and Check a Lace-Up or Stirrup Brace
For a mild-to-moderate lateral ankle sprain, use a semi-rigid or lace-up brace as functional support rather than locking the joint in a cast-style setup. Immobilization belongs to selected severe injuries, and only under clinical supervision. Before you lace anything, confirm the brace matches your ankle circumference and slides into the shoe you plan to wear.
Seat the heel, then the straps
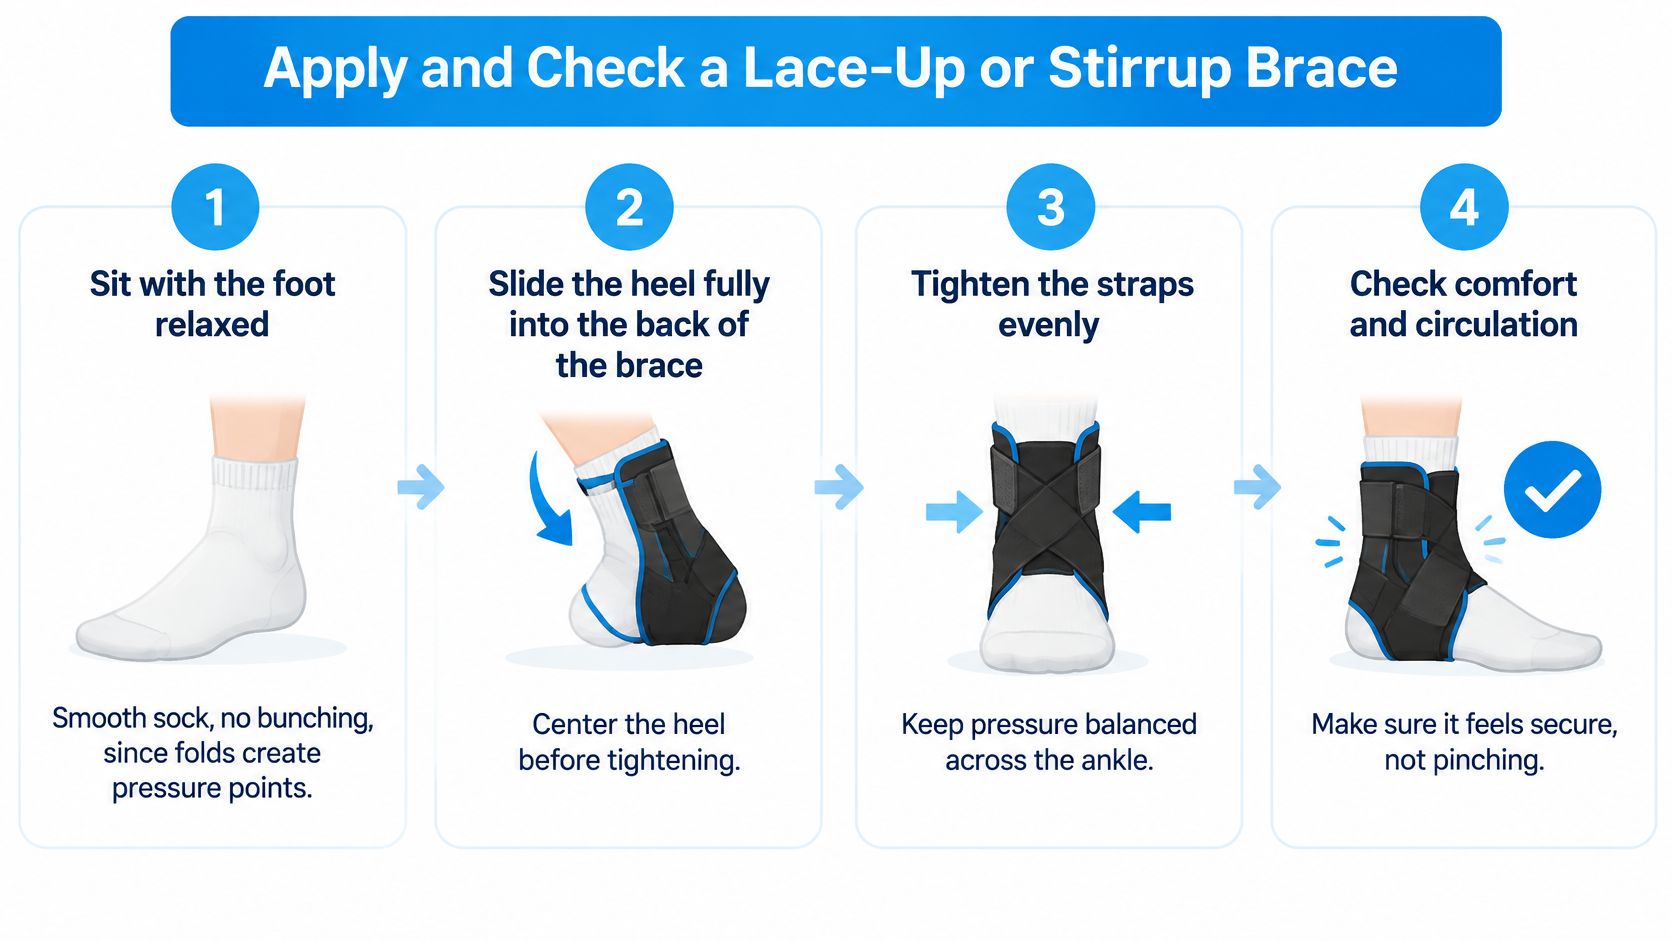
Sit with the foot relaxed. A smooth, thin sock with no folds matters, because a crease under a strap becomes a pressure point within an hour.
- Sit with the foot relaxed. Keep the ankle near a right angle, not pointed down. Pointing the toes makes the brace feel secure while you're seated and too tight once you stand.
- Slide the heel fully into the back of the brace. The heel should meet the heel cup. If it's only halfway in, every strap pulls the brace up the calf.
- Center the ankle bone between the side supports. The joint belongs in the middle of the uprights or stays, not jammed against one shell. Off-center support lets the foot roll inside the brace.
- Fasten from the midfoot upward. Straps or laces start low and move toward the calf so pressure spreads across the foot and lower leg. The common slip is yanking the strap nearest the sore spot first, which squeezes the injured area and leaves the midfoot loose.
- Stand and walk for several minutes. The heel shouldn't lift out of the cup, and the brace shouldn't climb the leg. A short hallway loop shows migration that a seated tug misses.
- Check the toes. They should stay warm, keep a normal color, and feel normal. Cold, pale, or tingling toes mean the brace comes off.
- Lace the shoe over the brace without extra ankle tightness. The shoe holds the brace. Crushing the ankle eyelets on top of a tight strap doubles the compression.
The 2018 BJSM ankle sprain guideline estimates that brace or tape use carries a relative risk of 0.30 (95% CI 0.21–0.43) for recurrent sprain. That figure is about repeat sprains when support is used well. It doesn't make a poorly fitted brace safe, and it doesn't replace diagnosis or rehab after a first injury.
The fit check on your feet
The brace should limit sideways rolling and still let you bend the ankle toward the shin and point the toes through a comfortable range. If the joint feels locked, the brace is too rigid for this stage or the straps are too tight. A locked ankle changes your gait, and a changed gait loads the knee and the hip.
Run through these checks before you leave the house:
- Top strap: It shouldn't dig a ridge into the calf. You should slide one finger under it.
- Seams: Nothing should rub the shin or the Achilles. A hot spot at minute ten is a blister by the end of a shift.
- Your shoe: Test the brace in that day's footwear. A running shoe that feels fine can bunch the same brace inside a boot. If you need the brace under everyday shoes, this note on an ankle brace you can wear with shoes covers the fit issues that show up once the shoe is closed.
- After sweat or a long walk: Fabric and laces relax. Retighten to the original snugness. Don't start the day overtight so it "lasts."
A brace that only feels right while you're sitting isn't fitted yet.
Reset the whole thing if any strap pinches. Loosen every closure, reseat the heel, and fasten from the midfoot again. Partial loosening leaves the heel high and the pressure in the same bad spot.
Lace-up versus stirrup while you fasten
A lace-up is a fabric boot. You control tension at several points, which helps when swelling changes through the day, and it takes longer to put on. A stirrup is two shells joined under the heel. You get less fine adjustment, and narrow shoes fight the uprights. In both cases the order stays the same: heel first, joint centered, closures from the midfoot up. Don't stack a second wrap over a stirrup for "extra hold" unless a clinician asked for it. Extra layers hide pressure and make the shoe impossible to close evenly.
I would rather spend three extra minutes reseating the heel than spend the afternoon with a numb forefoot. Bracing works when the joint stays centered and circulation stays normal.
How Long to Wear a Brace at Each Stage
| Phase | Typical support | Wear pattern | Move on when |
|---|---|---|---|
| First days, painful walking | Stirrup or lace-up brace; boot only if clinically directed | Wear for walking and daily tasks; check skin daily | Walking is possible without a pronounced limp |
| Rehabilitation, about weeks 1 to 6 | Semi-rigid or lace-up functional brace | Wear during daily activity and rehab sessions | Range of motion is restored and balance work is controlled |
| Return to activity, about weeks 6 to 12 | Lace-up brace for higher-demand sessions | Wear during practice and games, not all day | Cutting, pivoting, and landing feel controlled |
| Prior sprain, ongoing high-risk sport | Semi-rigid or lace-up brace | Wear during practices and games for 6 to 12 months | Coach or clinician confirms the ankle tolerates sport |
Protection first, then movement
Early on, the job is walking without a sharp limp, with firmer support while the joint is irritable. In rehabilitation, a functional brace stays on for daily tasks and for balance and strength sessions. It isn't a reason to skip those sessions. On return, all-day wear drops away. You put the brace on for cutting, landing, and uneven ground, then take it off for the quiet parts of the day.
In a 2014 British Journal of Sports Medicine trial, 384 athletes aged 18 to 70 were assigned to an eight-week neuromuscular program, a semirigid brace, or both. Over one year, recurrence hit 29 people (27%) in the training group, 17 (15%) in the brace group, and 23 (19%) in the combined group. Bracing versus training alone gave a relative risk of 0.53 (95% CI 0.29 to 0.97). Bracing cut how often sprains came back more than training alone. It didn't reduce how severe those sprains were when they happened.
The brace lowers exposure while tissues settle. Balance, strength, and movement control still have to come back, or the ankle stays dependent on plastic and laces. More restriction isn't automatically better. A boot left on after walking is already comfortable can add stiffness you then have to earn back.
Write down the phase you're in, what you wear, and what you can do without a limp. Take that note to a clinician so the next step is shared, not a guess from a calendar. A sprained ankle healing timeline helps when you're mapping weeks to what the ankle can do.
Warning Signs to Stop Bracing and Seek Care
Sort what you feel into "fix the brace now" and "this needs a clinician today." A tight strap and a broken bone can both hurt. They don't get the same response.
| Sign | What it usually means | Action |
|---|---|---|
| Numbness or tingling under or around the brace | Brace too tight or circulation restricted | Loosen or remove now and re-check |
| Pale, blue, or cold toes | Restricted blood flow | Remove the brace and seek care if color doesn't return |
| Swelling below the brace | Compression or restriction of return flow | Loosen, elevate, and re-check |
| Pain that rises while walking | Load too high or injury more serious | Stop activity and arrange clinical review |
| Cannot bear weight or walk | Possible fracture or severe ligament injury | Seek same-day medical care |
| Visible deformity or bone tenderness at the ankle | Possible fracture | Seek urgent medical care |
Loosen or remove now
Numbness or tingling, pale or blue toes, and swelling that balloons below the brace usually mean the closure is too tight or fluid can't return past the strap. Pain that climbs while you walk can mean the load is too high for this stage, or the injury is more than a simple sprain. Take the brace off, rest the leg up, and try again only after color and feeling return and you've reseated the heel. If color stays off, don't put it back on.
Check the skin each evening. A red line that doesn't fade, rubbing at the Achilles, or a strap mark that stays tender is a fit problem. It becomes a wound if you sleep in a rigid brace or keep the same hot spot through a work week.
Same-day care, and problems that linger
Inability to bear weight, a visible deformity, bone tenderness at the ankle, or a sudden loss of walking needs same-day medical care. Those signs can mean a fracture or a severe ligament injury. A brace isn't a reason to wait that out.
A third group sits between those two. Instability that doesn't ease as the weeks pass, repeated giving way on flat ground, or symptoms that outlast the phase you thought you were in need a clinician, not a stiffer brace ordered online. If the brace itself is driving the pain, stop and read what to do when an ankle brace makes pain worse before you size up.
If you can't walk on it, the next step is an assessment, not a tighter strap.
Decide When to Stop Bracing Safely
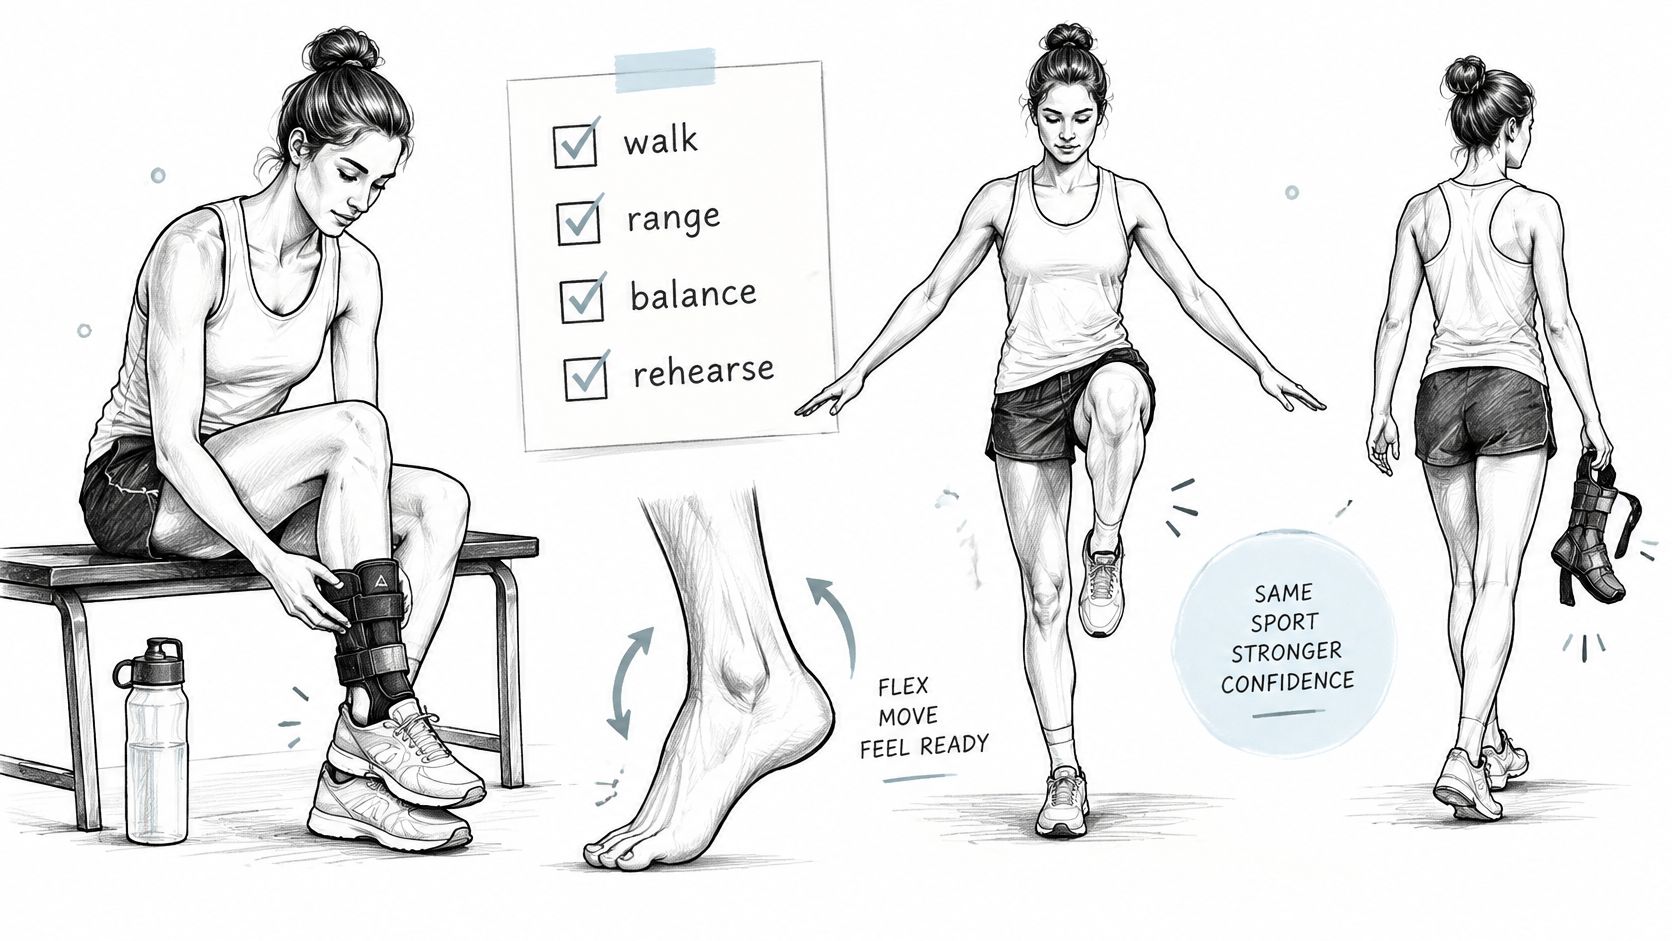
A steady walk around the house is a useful first sign, but it does not prove the ankle is ready for every demand. Reduce bracing in stages, matching support to healing and activity rather than a calendar date.
The self-check
Progress from one task to the next only if the ankle stays calm: no pain spike, limp, or new swelling that evening.
- Walking: Walk with little or no pain and a normal push-off.
- Motion: Bend the ankle toward the shin and point the toes through a range close to the other side for daily tasks.
- Balance: Stand on one leg with the knee soft and the foot steady, without gripping the floor with your toes.
- The key task: Rehearse what you need to do, from short walks to turning, then cutting and less predictable movement.
Return to activity depends on pain, gait, push-off, strength, balance, running, cutting, and confidence. The NATA ankle sprain guidance supports functional bracing or taping for roughly 4–6 weeks after a sprain as more effective than prolonged casting for preventing recurrence. Athletes with a prior sprain may benefit from support during practices and games for 6–12 months. Those periods are guides, not a reason for every adult to wear a brace all day.
Match support to the activity and the ankle's response.
A brace that causes numbness, color change, rubbing, or a limp needs adjustment or removal. A secure-feeling brace is not a reason to ignore those signs.
Two different finish lines
For sport, track which criteria you can meet and review them with a clinician or physiotherapist before returning fully. Keep support for high-demand sessions until the ankle has been assessed for those tasks.
For daily mobility, stop using a restrictive brace once walking at home and outdoors is steady and nearly pain-free. A comfort sleeve is a separate option, provided it does not substitute for an assessment when one is needed. The Thermo Lite Recovery Ankle Sleeve is priced at $24.99. The Lite collection includes ankle, elbow, wrist, back, dual shoulder, and knee sleeves. It is lightweight comfort wear, not a sprain brace, and the products are not designed to prevent injury.
Keep mobility work in the plan as you reduce support. Ankle mobility exercises can accompany the transition so the joint keeps moving as brace use tapers.
Compare your ankle's range with the supported movements in the clip before stopping the brace completely.
Thermo Recovery Wear makes compression-lite recovery sleeves for ankle comfort during rest and light daily movement. Consider them only after a clinician has cleared you to move beyond a restrictive brace. For everyday joint comfort rather than sport support, review the Thermo Recovery Wear ankle options and fit notes. If the ankle still gives way, seek professional assessment before relying on a sleeve.


