


A wrist brace should be snug enough to stop sliding and hold your wrist near neutral, but never tight enough to change finger warmth, color, sensation, or movement. There's no validated fixed strap force or two-finger test that establishes a safe fit.
You might be sitting with the brace half-fastened right now, wondering whether another pull on the strap will finally make your wrist feel supported. Or it felt comfortable when you put it on, but your fingers are starting to tingle after typing or walking. Tighter isn't more therapeutic. The useful question is whether the brace still supports your wrist without creating a new problem.
Table of Contents
- How Tight a Wrist Brace Should Feel
- How to Fasten the Brace and Check the Fit
- What to Do When Fingers Go Numb or Cold
- Rechecking Fit After Swelling Sleep and Activity
- Tips for Arthritis Sprains and Sensitive Skin
- Decide Whether This Brace Can Stay On
How Tight a Wrist Brace Should Feel
Pulling every strap as far as it will go can make a brace feel secure while leaving the fingers tingling. That's not successful stabilization. The brace's shape and support should help hold your wrist, rather than relying on a narrow strap squeezing hard enough to stop everything moving.
Use this comparison before deciding whether you need more tension.
Wrist brace fit at a glance
| Fit level | What you notice | Fingers and color | What to do |
|---|---|---|---|
| Too loose | Brace slides and the painful wrist motion still happens | Warm, normal color, but no real support | Refasten evenly or choose a size that stays put without digging |
| Just right | Brace stays centered and wrist stays near neutral | Fingers bend, warm, usual color | Keep that setting and recheck later |
| Light mark that fades | Faint strap imprint fades shortly after removal | Warmth and movement unchanged | Monitor it; reassess after activity |
| Too tight | Deep grooves, rising pain, or a tourniquet feel | Numb, tingling, blue, pale, or colder than the other hand | Loosen or remove now |
A snug fit is recommended because a loose brace might not work as well, but it shouldn't feel constrictive. The NHS wrist-splint patient guide describes a splint that's comfortable, holds the wrist in position, and doesn't affect circulation or cause swelling.
Judge support by what happens when you move
With the forearm resting, a poorly fitted brace may seem fine. Gently bend and straighten your fingers instead. The brace should remain centered without its edges crowding the knuckles or its support shifting away from the wrist.
Don't deliberately force the wrist against a rigid stay to test its strength. You're checking whether the device maintains its intended position during comfortable movement, not whether you can overpower it.
Even contact matters more than maximum tension. A strap that digs into one spot while the rest of the brace gaps isn't distributing support well. Pulling that strap harder usually increases local pressure without correcting the underlying alignment.
Distinguish an imprint from a pressure problem
A faint fabric or strap impression isn't automatically an injury, but it's not proof of a good fit either. Look at whether it fades, whether the skin feels irritated, and whether your hand remains comfortable.
Deep persistent grooves, discomfort that builds, or repeated tightening suggest a size or positioning problem. A brace that creeps toward your palm may need reseating rather than another hard pull.
Before buying a different size, open the straps and start again with the wrist properly positioned. Straps fine-tune a suitable brace; they can't turn the wrong shape into the right support.
How to Fasten the Brace and Check the Fit
Start with the straps open rather than pushing your hand through a partly fastened brace. That makes it easier to position the support without folding the lining or dragging the thumb opening against your skin.
This fitting sequence keeps positioning separate from tightening.
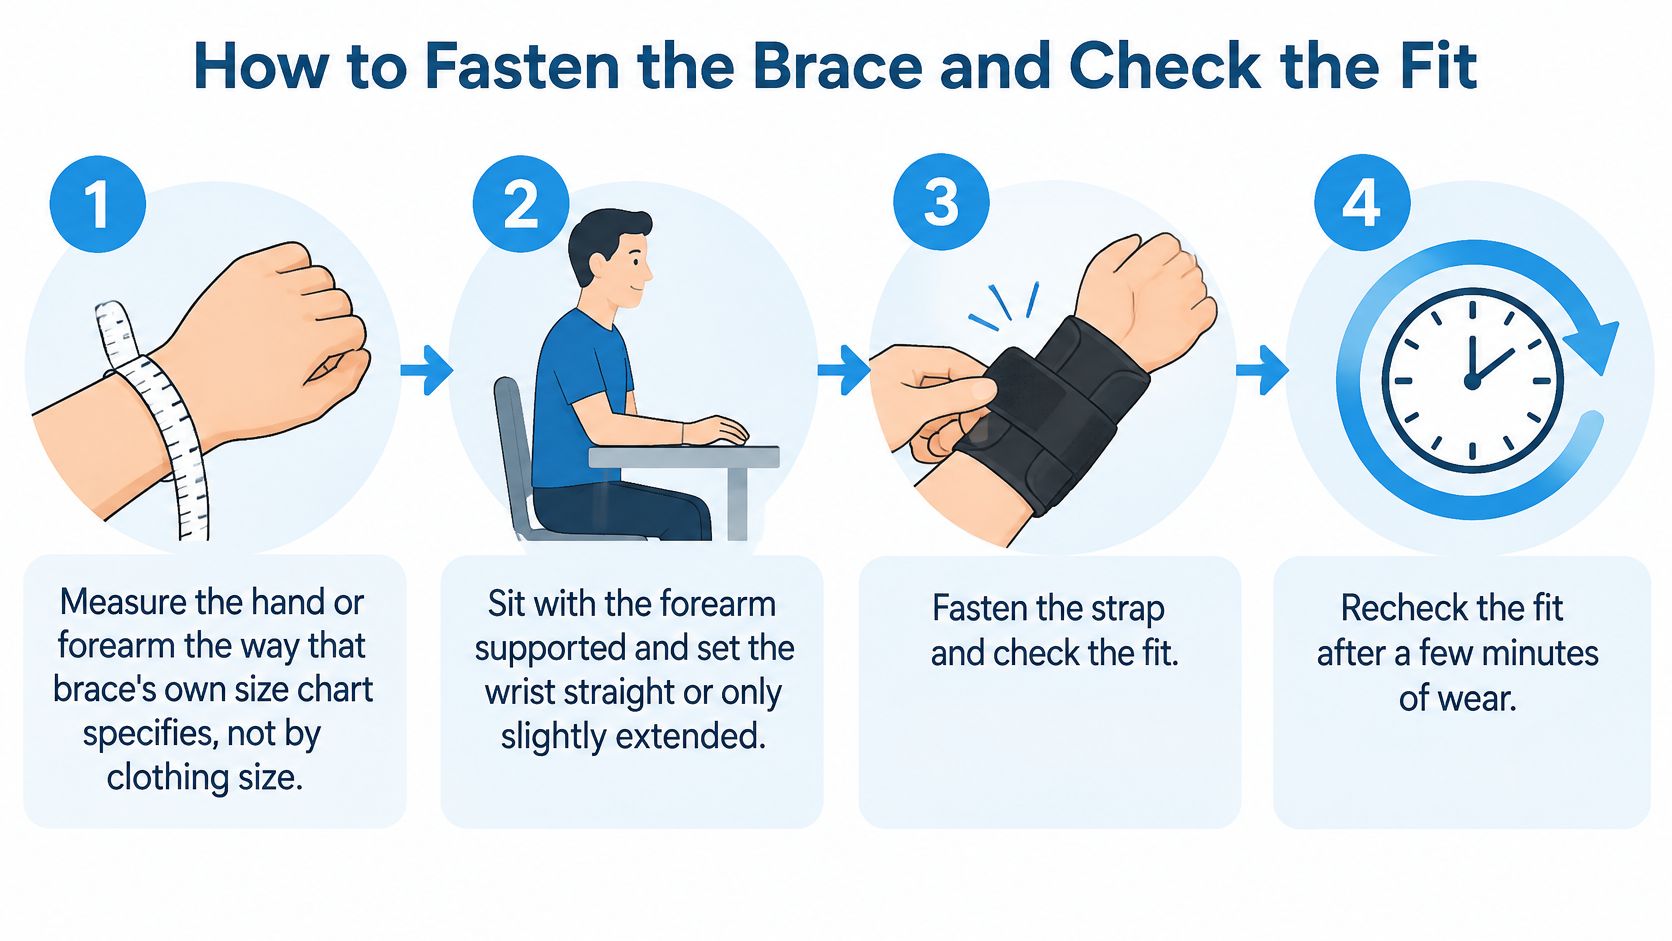
Fit the support before adding tension
- Measure where the size chart tells you. Use a flexible tape around the specified part of your hand, wrist, or forearm, keeping the tape flat rather than pulling it into the skin. Don't substitute clothing size or assume another brand's sizing will match.
- Rest your forearm and position your wrist. Keep it straight or only slightly extended, rather than cocked backward. The wrist-splint study available through PubMed Central supports near-neutral positioning, typically 0–5° of extension and generally no more than 0–15°, because greater extension can increase carpal-tunnel pressure.
- Seat the hand and center the support. Pass the thumb through its opening and make sure the brace's stay is aligned with the wrist as intended. Don't bend a rigid stay yourself unless your clinician or the device instructions specifically direct you to.
- Fasten gently and evenly. Follow the brace's specified strap order, beginning without restrictive tension. Where no order is given, bring the straps into light contact first, then adjust progressively rather than fully tightening a single strap while the others remain open.
- Stop tightening when the brace stays put. Gently move your fingers and check that the support doesn't slide or rotate. The knuckles should still bend, and a basic wrist brace shouldn't trap the thumb against an edge.
- Pause before accepting the fit. After several minutes, compare the warmth and color of both hands and move every finger again. If tingling, coldness, or poorer movement appears, loosen or remove the brace instead of finishing the adjustment.
- Try an appropriate light task and reassess. Typing briefly or holding a light cup can reveal a pinching edge that wasn't noticeable at rest, provided the activity is allowed for your condition. Don't use heavy lifting as a fitting test.
Don't use tightness to compensate for the wrong device
Thumb-support designs need particular care around the web between the thumb and index finger. Our guide to wearing a wrist brace with thumb support explains that additional coverage, which shouldn't be confused with a need for additional squeeze.
Likewise, gym accessories and recovery splints have different jobs. If you're choosing equipment specifically for training, you can compare wrist support lifting gloves through Bowling Gear Reviews, but don't assume a lifting glove can replace prescribed immobilization.
Practical rule: If correcting the position reduces the amount of strap tension you need, keep the better position, not the tighter setting.
A correctly fitted brace should let you perform permitted hand tasks without constantly readjusting it. If it still rotates, pinches, or blocks finger movement after careful fitting, stop trying to solve the problem with strap force. Recheck the size chart and have the device assessed if necessary.
What to Do When Fingers Go Numb or Cold
Take the brace off if your fingers become numb, unusually cold, blue or pale, difficult to move, or increasingly painful. Don't keep it on while you experiment with the remaining straps.
Changes in sensation and temperature deserve attention even when the brace looks neatly fastened. A clinician may need to assess the hand rather than recommend a tighter or looser setting.
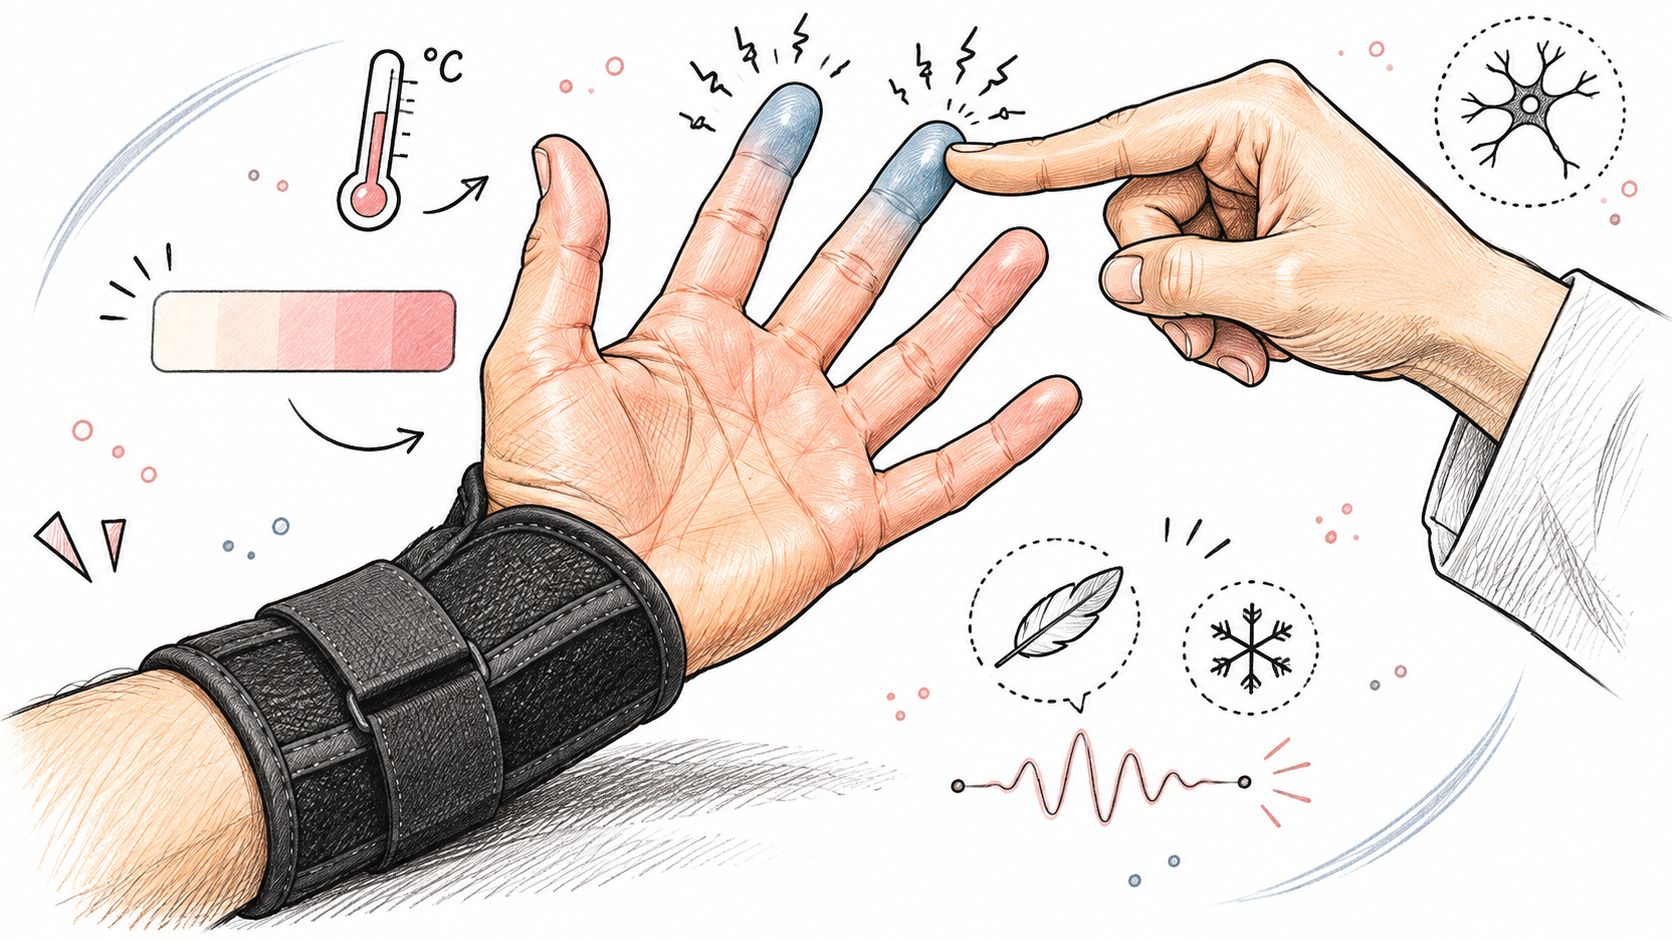
The Kingston and Richmond NHS Futura splint instructions advise removing the splint and elevating the arm for 10 minutes when pressure-related symptoms occur, then seeking clinical advice if they continue. Support the arm comfortably rather than letting the hand hang down while you assess it.
Separate symptom relief from permission to restart
If warmth, color, and sensation return after removal, you still need to correct the fit. Improvement doesn't establish that the previous setting was safe or that the same device should immediately go back on unchanged.
If the hand recovers, reassess the size, position, and wear plan before trying again. If symptoms persist after removal and elevation, stop wearing the brace and get clinical advice rather than trying another strap pattern.
When you do resume a suitable brace, start without the tension that triggered symptoms and monitor it closely. If the same problem returns despite careful positioning, the next step is professional assessment, not repeated cycles of tightening and loosening.
Don't assume every symptom comes from the brace. Pain extending beyond the wrist may need a broader assessment; our guide to pain from the wrist to the elbow can help you describe where the discomfort travels, but it doesn't replace an examination.
Don't wait for pain if sensation is reduced
People with reduced sensation, fragile skin, vascular disease, or substantial swelling need extra caution. If feeling is unreliable, a painful pressure point may not provide an early warning.
Check visible skin, compare hand temperature, and notice whether finger movement has changed. A caregiver can help with these observations if inspecting or adjusting the brace is difficult.
A demonstration may help you recognize the areas a hand assessment can involve.
Don't sleep through new warning signs. If tingling or coldness wakes you, remove the brace and assess the hand rather than waiting until morning.
Severe or rapidly worsening symptoms, a persistently discolored or cold hand, or a new inability to move the fingers warrant urgent medical attention. Don't delay urgent assessment just to complete a home fit check.
Rechecking Fit After Swelling Sleep and Activity
A comfortable morning fit isn't a guarantee for the rest of the day. Swelling and changes in hand position can alter how the same straps press against your wrist.
The answer to how tight a wrist brace should be therefore depends on the fit you have now, not the setting you remember using successfully yesterday. The Physio Inq guide to choosing a splint provides context for matching support to your needs; fit also needs reassessing during swelling, activity, and prolonged wear.
When to recheck wrist brace tightness
| When you check | What often changes | Fit adjustment |
|---|---|---|
| First fastening | Baseline strap tension | Snug and even, wrist near neutral |
| After several minutes | Early tightness or strap creep | Loosen slightly or refasten evenly |
| After activity or a hanging hand | Swelling can increase circumference | Loosen or remove; elevate if symptoms start |
| Before sleep and on waking | Overnight fit and swelling may change | Follow the advised night fit and reassess on waking |
| Daily skin inspection | Redness, rubbing, or grooves that stay | Reposition, resize, or stop and get advice |
Match the checks to the job
A carpal-tunnel night splint is intended to maintain the prescribed wrist position during sleep. Check it before bed and if symptoms wake you; don't add extra tension because you won't be watching the brace overnight. Our guide to wearing a wrist brace at night discusses considerations for overnight use.
With an acute sprain, don't assume yesterday's strap overlap is your permanent setting. Say you fasten the brace before errands and return with a fuller, tighter-feeling hand. Reassess the fit rather than treating the increased pressure as useful compression.
For light daytime overuse support, check what happens during ordinary tasks. A brace that feels comfortable while resting may rub at the thumb opening when you type or reach for a mouse.
These changing situations are easier to manage when you treat fitting as an ongoing check.
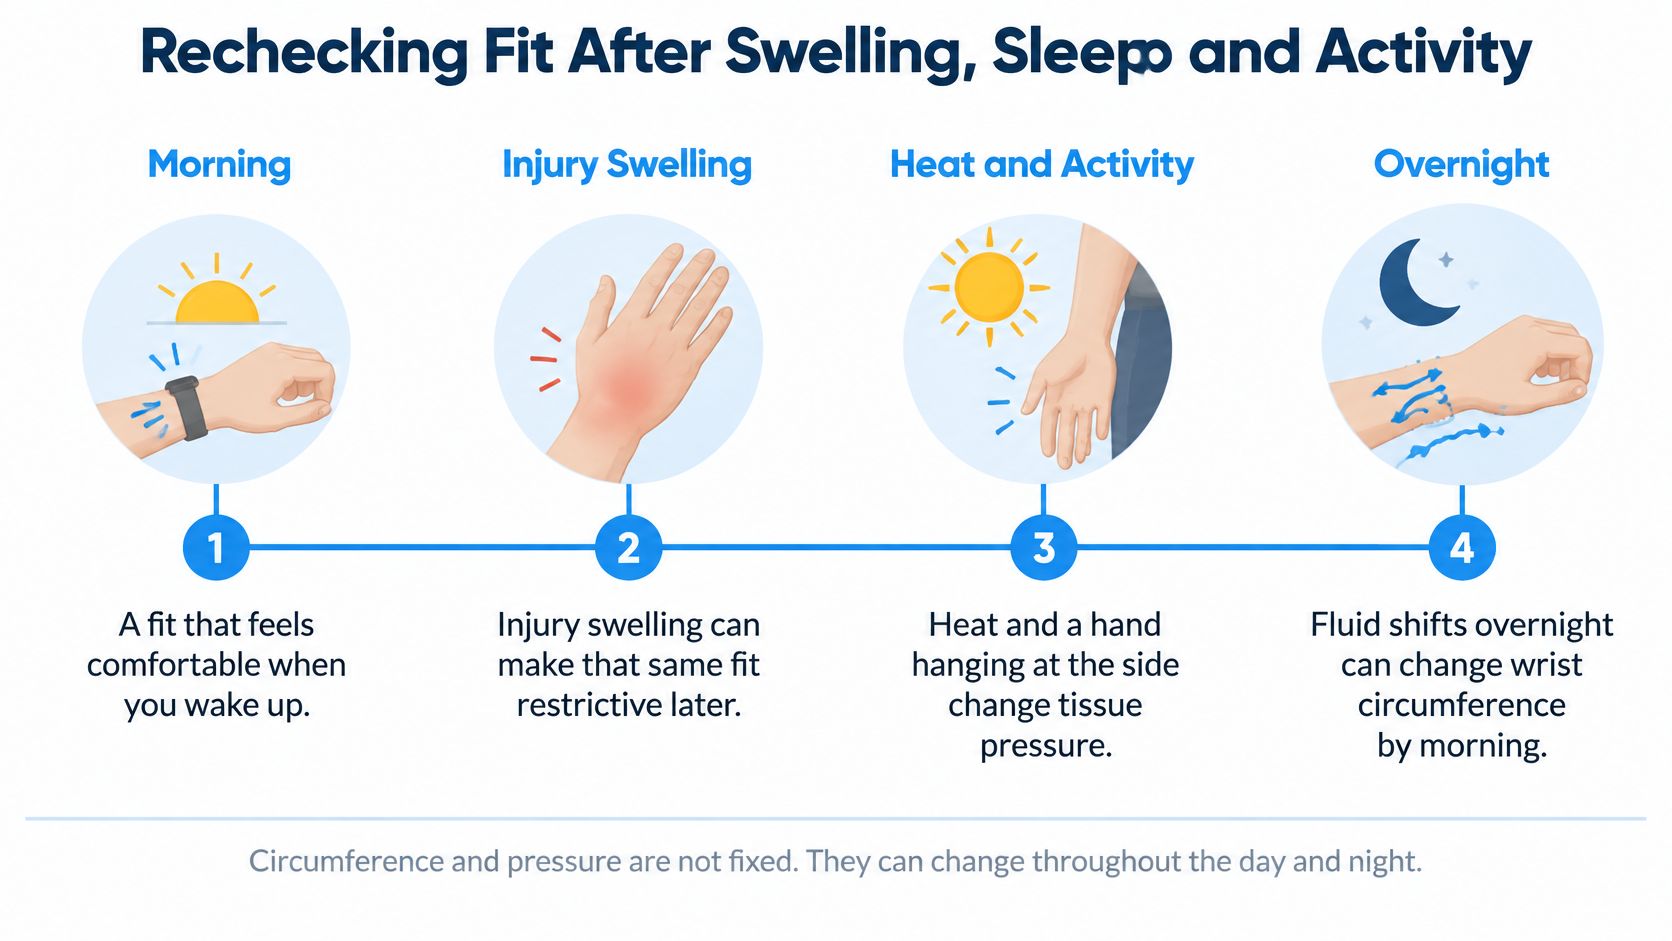
Adjust without abandoning support
If the brace feels slightly restrictive but there are no warning symptoms, make a small adjustment and reassess the whole hand. Loosening every strap until the brace hangs freely can allow movement and edge rubbing.
Take the brace off for skin inspection according to your prescribed wear plan. Look around the thumb opening, beneath strap edges, and over bony areas for redness that doesn't fade, tenderness, or persistent grooves.
Older adults and people with diabetes, vascular disease, or reduced sensation should arrange a cautious wear plan with their clinician. They shouldn't rely solely on discomfort to decide when a check is needed.
The useful habit is simple: connect a fit check to a change in activity or swelling. You don't need a pressure gauge, and yesterday's strap position isn't a substitute for looking at your hand today.
Tips for Arthritis Sprains and Sensitive Skin
Good wear habits help preserve a fit that's already comfortable. They don't make an unsuitable brace safe, but they can prevent slipping, dampness, and concentrated pressure from turning into repeated overtightening.
Start with the skin and anything else sharing space under the brace.
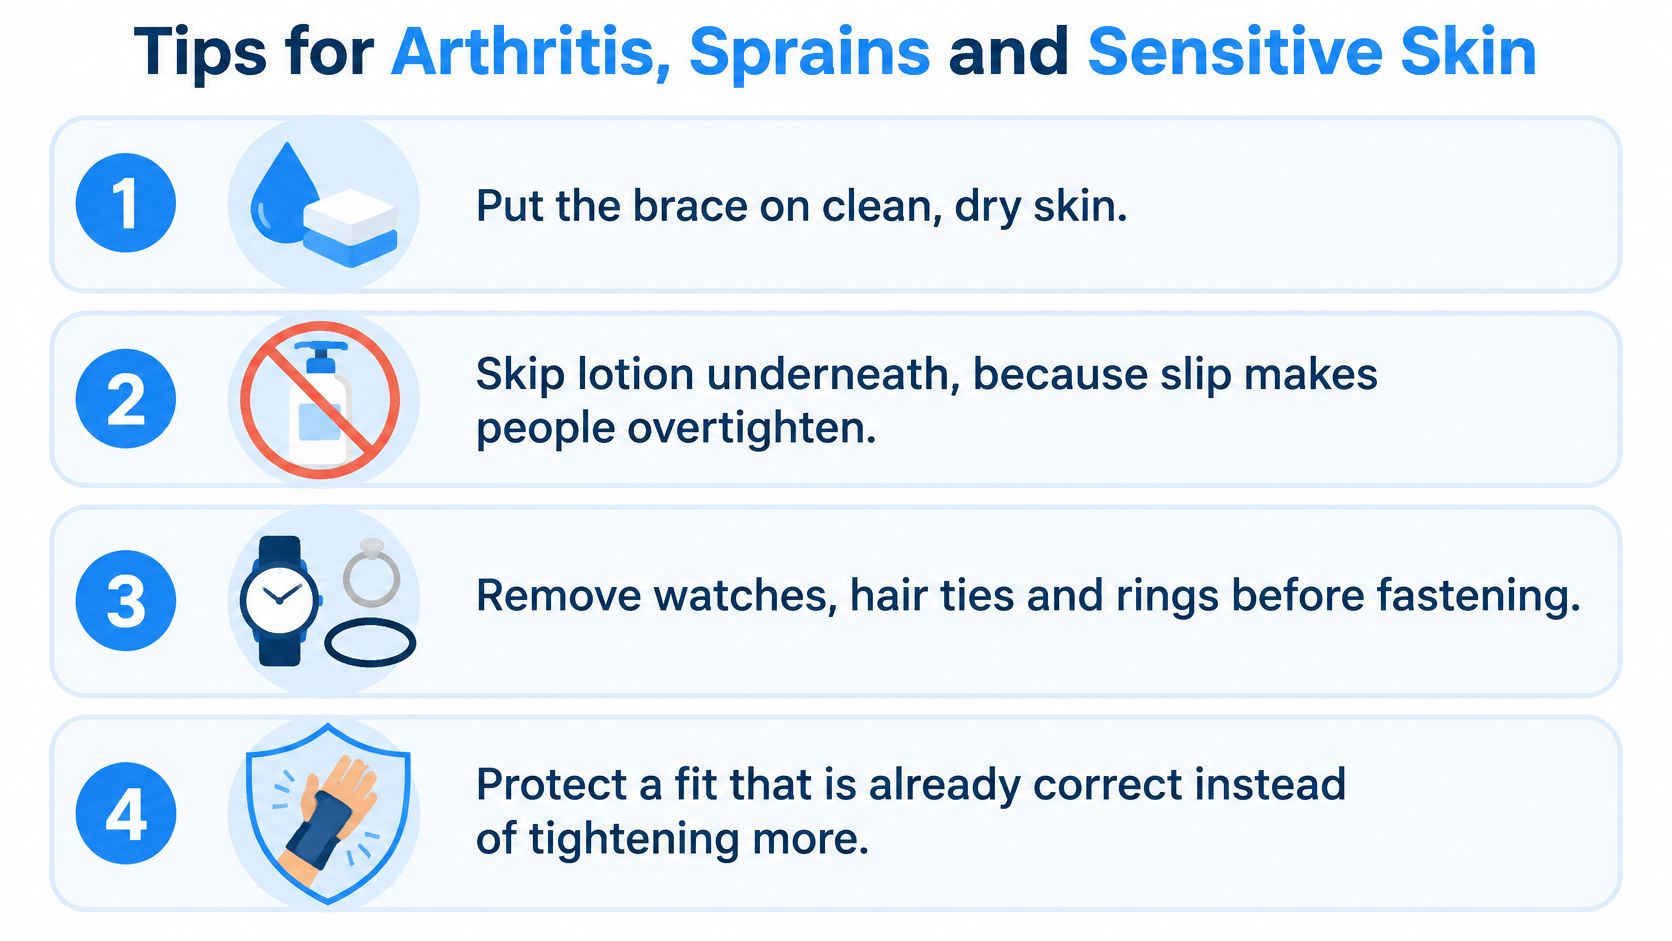
Prepare the wrist rather than pulling harder
- Use clean, dry skin. Unless your clinician has given different skin-care instructions, avoid applying lotion immediately beneath the brace. If the lining slips, reseat it instead of compensating with more tension.
- Remove competing pressure. Watches, fitness bands, and hair ties shouldn't sit beneath the brace or crowd its edges. With swelling, remove rings early if they're becoming restrictive.
- Smooth the lining. A folded seam can create a pressure point even when the overall tension is reasonable. Open the device fully and flatten the fabric rather than tugging at it while fastened.
- Follow the care instructions. Wash and dry the brace as directed, and inspect the fasteners. Don't tighten harder to compensate for straps that no longer hold reliably.
For arthritic stiffness, the aim is an appropriate resting position and usable support, not crushing the painful joint. If discomfort steadily increases while you type, stop and inspect the fit rather than assuming the brace needs to work harder.
With a fresh sprain, leave room in your routine for reassessment. A brace doesn't establish that the injury is minor, and a visibly deformed wrist or unexplained worsening pain needs assessment rather than a stronger wrap.
Make skin comfort part of device selection
Sensitive skin often needs attention to seams, edges, moisture, and cleaning products as well as fabric choice. Our guide to the best fabric considerations for sensitive skin can help you evaluate material options without assuming any fabric is irritation-proof.
If a hot spot develops, stop and inspect it. Adding a bulky pad beneath a fitted brace can change the pressure and positioning, so don't improvise extra layers without checking the device instructions or asking the fitting clinician.
If a brace only feels supportive when it hurts, reconsider the size or type of support instead of accepting pain as the price of stability.
For permitted daytime movement, preparation can matter more than extra bracing tension. AloeCure's warm up routines for joint health offers a related resource, but an injured wrist still needs an activity plan suited to its diagnosis.
Don't turn a rigid daytime brace into a night splint by leaving it on. Confirm that the device and wearing schedule are appropriate for sleep, particularly if you already have recurrent overnight symptoms.
Decide Whether This Brace Can Stay On
Keep the current brace if it does its intended job during permitted activity and remains comfortable at reassessment. You shouldn't need to choose between useful support and a normally functioning hand.
Change the size or style if the brace won't stay centered without painful pressure, its fasteners need constant attention, or its edges repeatedly irritate the same spot. A different support design may be more useful than another adjustment.
Choose between keeping, replacing, and getting assessed
- Keep it when it maintains the intended wrist position without creating symptoms or persistent skin marks.
- Refit or replace it when the fit fails mechanically, such as sliding, twisting, or needing excessive tension.
- Get clinical advice when symptoms continue after removal, or swelling and night symptoms repeatedly return despite a careful fit.
Be clear about why you're using support before choosing a replacement. Our guide to reasons to wear a wrist brace can help distinguish everyday support needs from situations that call for a specific splint.
Consider light support only when it matches the need
For people who want comfortable daytime support without a squeezing fit, our Thermo Lite Recovery Wrist Sleeve is currently $14.99. It's part of the Lite collection, uses a Bamboo + Charcoal textile, and provides non-compressive support that allows movement.
A customer who used the product for a sprained wrist and sprained elbow after a fall described the results as immediate and said it wasn't expensive and did the job. That's an individual account, not a promise of injury recovery or a reason to skip assessment.
A flexible sleeve is a different tool from a rigid splint. It doesn't replace prescribed immobilization after a fracture or a clinician's carpal-tunnel treatment plan.
Keep, resize, or get checked based on what your hand tells you during wear. If a clinician has specified a device, follow that device's fitting and wearing instructions before considering an alternative.
Thermo Recovery Wear offers compression-lite sleeves for everyday joint support without the squeeze of traditional compression. Visit Thermo Recovery Wear to review wrist-support options and sizing guidance, and choose a garment that matches your activity and any clinical instructions you've been given.


